作者:武卓博士 英特尔AI布道师
AI已成为助力千行百业智能化升级的关键技术,然而在行业实践中,如何在应用现场高效提升AI模型的精度和速度,已成为AI模型商业化落地的一大挑战。基于英特尔®视频AI计算盒打造一个从模型训练到优化部署的AI训推一体流水线(Train & Inference pipeline)便成为一个有效的解决方案。
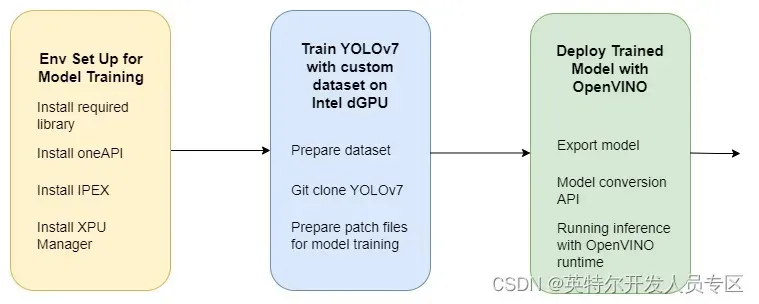
在本文中,我们将展示搭建一个AI训推一体流水线的关键组件(如下图所示),从使用基于oneAPI的IPEX实现模型训练,到使用OpenVINO进行模型优化和部署。这种端到端的方法不仅简化了开发过程,还确保了深度学习模型的可扩展性、可再现性及可维护性。

Figure1. 深度学习流水线,在英特尔独立显卡上利用OpenVINO 以及IPEX
进行模型训练及部署
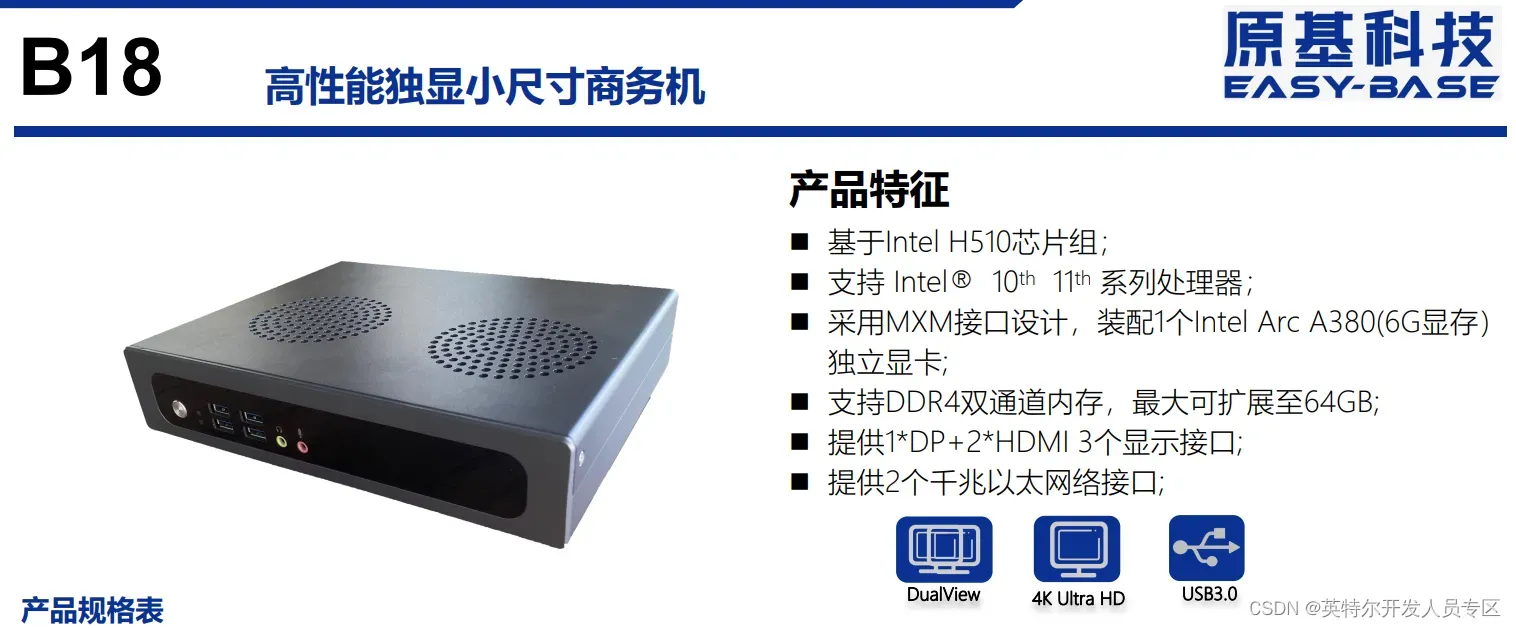
接下来,本文将在带有英特尔®锐炫显卡ARC® A380来自于原基科技的 B18完成YOLOv7模型训练。下一篇文章将接着介绍基于OpenVINO实现YOLOv7模型推理。

安装使用IPEX在dGPU上训练所需的库
以下命令用于安装所需的库,以在dGPU上启用训练,如果没有该库,IPEX就无法检测XPU,因此无法使用dGPU进行训练。
wget -qO - https://repositories.intel.com/graphics/intel-graphics.key | sudo gpg --dearmor --output /usr/share/keyrings/intel-graphics.gpg
echo "deb [arch=amd64,i386 signed-by=/usr/share/keyrings/intel-graphics.gpg] https://repositories.intel.com/graphics/ubuntu jammy arc" | sudo tee /etc/apt/sources.list.d/intel-gpu-jammy.list
sudo apt-get install -y \
intel-opencl-icd intel-level-zero-gpu level-zero \
intel-media-va-driver-non-free libmfx1 libmfxgen1 libvpl2 \
libegl-mesa0 libegl1-mesa libegl1-mesa-dev libgbm1 libgl1-mesa-dev libgl1-mesa-dri \
libglapi-mesa libgles2-mesa-dev libglx-mesa0 libigdgmm12 libxatracker2 mesa-va-drivers \
mesa-vdpau-drivers mesa-vulkan-drivers va-driver-all vainfo hwinfo clinfo
安装GPU驱动程序和所需库后,我们将安装英特尔oneAPI基本工具包和IPEX,用于在英特尔独立显卡上执行模型训练。
安装 Intel® oneAPI Base Toolkit 2023.1
英特尔oneAPI基本工具包是一套核心工具和库,用于跨各种体系结构开发高性能、以数据为中心的应用程序。可以使用以下命令安装基本工具包:
sudo ls

wget -O- https://apt.repos.intel.com/intel-gpg-keys/GPG-PUB-KEY-INTEL-SW-PRODUCTS.PUB | gpg --dearmor | sudo tee /usr/share/keyrings/oneapi-archive-keyring.gpg > /dev/null

echo "deb [signed-by=/usr/share/keyrings/oneapi-archive-keyring.gpg] https://apt.repos.intel.com/oneapi all main" | sudo tee /etc/apt/sources.list.d/oneAPI.list

sudo apt update

sudo apt install intel-basekit
安装 Intel® Extension for PyTorch (IPEX)
Intel® Extension for PyTorch* extends PyTorch with up-to-date features optimizations for an extra performance boost on Intel hardware. Optimizations take advantage of AVX-512 Vector Neural Network Instructions (AVX512 VNNI) and Intel® Advanced Matrix Extensions (Intel® AMX) on Intel CPUs as well as Intel Xe Matrix Extensions (XMX) AI engines on Intel discrete GPUs. Moreover, through PyTorch xpu device, IPEX provides easy GPU acceleration for Intel discrete GPUs with PyTorch. Therefore, we will use IPEX for model training on Intel® dGPU. Installation of IPEX uses the following command:
IPEX通过最新的功能优化对PyTorch进行扩展,从而在英特尔硬件上获得额外的性能提升。优化利用了英特尔CPU上的AVX-512矢量神经网络指令(AVX512 VNNI)和英特尔高级矩阵扩展(AMX)以及英特尔独立显卡的Xe矩阵扩展(XMX)AI引擎。此外,通过PyTorch xpu设备,IPEX为使用PyTorch的英特尔独立显卡提供了简单的GPU加速。因此,我们将使用IPEX在英特尔独立显卡上进行模型训练。IPEX的安装使用以下命令:
# Intel® oneAPI Base Toolkit 2023.1 is installed to /opt/intel/oneapi/

export ONEAPI_ROOT=/opt/intel/oneapi


# A DPC++ compiler patch is required to use with oneAPI Basekit 2023.1.0. Use the command below to download the patch package.


wget https://registrationcenter-download.intel.com/akdlm/IRC_NAS/89283df8-c667-47b0-b7e1-c4573e37bd3e/2023.1-linux-hotfix.zip

unzip 2023.1-linux-hotfix.zip

cd 2023.1-linux-hotfix

source ${ONEAPI_ROOT}/setvars.sh

sudo -E bash installpatch.sh


sudo apt install python3-venv

cd

python3 -m venv ipex

source ipex/bin/activate

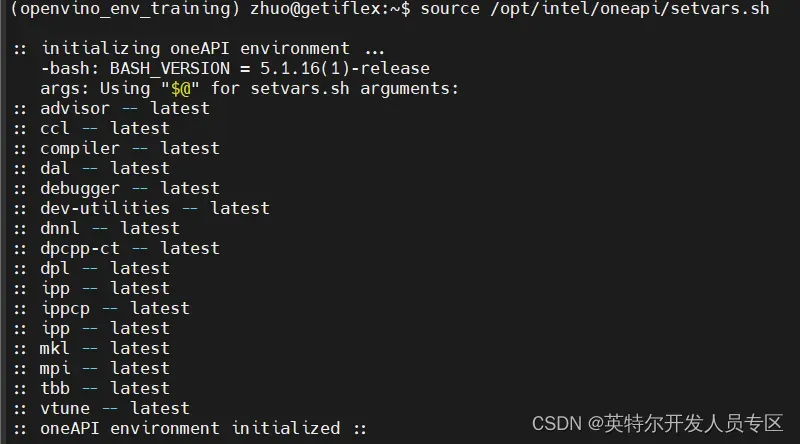
python -m pip install torch==1.13.0a0+git6c9b55e torchvision==0.14.1a0 intel_extension_for_pytorch==1.13.120+xpu -f https://developer.intel.com/ipex-whl-stable-xpu好了,现在已经成功安装了IPEX,接下来可以利用IPEX来执行模型训练了。注意:每次在一个新的终端窗口(cmd window)使用IPEX的时候,需要首先使用以下命令激活oneAPI环境:
source /opt/intel/oneapi/setvars.sh激活oneAPI的过程如下图所示:

接下来我们可以激活创建的ipex虚拟环境,
source ipex/bin/activate然后导入IPEX工具包如下图所示:

安装 XPU manager 获取GPU运行的相关信息
我们可以使用XPUmanager来获取GPU功率、频率、使用的GPU内存、计算引擎%、复制引擎%和throttle原因。安装使用以下命令:
wget -c https://github.com/intel/xpumanager/releases/download/V1.2.13/xpumanager_1.2.13_20230629.055631.aeeedfec.u22.04_amd64.deb

sudo apt install intel-gsc libmetee

sudo dpkg -i xpumanager_1.2.13_20230629.055631.aeeedfec.u22.04_amd64.deb

xpumcli dump -d 0 -m 1,2,18,22,26,35
现在,我们已经在dGPU上设置了模型训练的环境。接下来将展示如何使用自定义数据集训练YOLOv7模型。
在自定义数据集上训练 YOLOv7
在本文中,我们将在自定义数据“Pothole”上训练YOLOv7深度学习模型。整个训练过程包括以下步骤:
1. 自定义数据集
使用以下命令下载:
wget https://learnopencv.s3.us-west-2.amazonaws.com/pothole_dataset.zip

unzip -q pothole_dataset.zip
2. 从GitHub上克隆YOLOv7 仓库
使用以下命令克隆YOLOv7仓库,并进行安装:
git clone https://github.com/WongKinYiu/yolov7.git

cd yolov7

pip install -r requirements.txt
3. 为训练基于自定义数据集的模型生成补丁文件
由于我们将使用自定义数据集训练YOLOv7模型,因此需要对原始训练脚本进行一些更改。因此,在执行模型训练之前,需要生成以下补丁文件“yolov7_xpu.patch”。
diff --git a/train.py b/train.py
index 86c7e48..21815b7 100644
--- a/train.py
+++ b/train.py
@@ -286,7 +286,9 @@ def train(hyp, opt, device, tb_writer=None):
     model.nc = nc  # attach number of classes to model
     model.hyp = hyp  # attach hyperparameters to model
     model.gr = 1.0  # iou loss ratio (obj_loss = 1.0 or iou)
-    model.class_weights = labels_to_class_weights(dataset.labels, nc).to(device) * nc  # attach class weights
+    #model.class_weights = labels_to_class_weights(dataset.labels, nc).to(device) * nc  # attach class weights
+    model.class_weights = labels_to_class_weights(dataset.labels, nc) * nc  # attach class weights
+    model.class_weights = model.class_weights.to(device)
     model.names = names

     # Start training
diff --git a/utils/autoanchor.py b/utils/autoanchor.py
index f491032..5bb3f1a 100644
--- a/utils/autoanchor.py
+++ b/utils/autoanchor.py
@@ -49,7 +49,10 @@ def check_anchors(dataset, model, thr=4.0, imgsz=640):
             print(f'{prefix}ERROR: {e}')
         new_bpr = metric(anchors)[0]
         if new_bpr > bpr:  # replace anchors
-            anchors = torch.tensor(anchors, device=m.anchors.device).type_as(m.anchors)
+            print("*** m.anchars.device : {}".format(m.anchors.device))
+            #anchors = torch.tensor(anchors, device=m.anchors.device).type_as(m.anchors)
+            anchors = torch.tensor(anchors).type_as(m.anchors)
+            anchors = anchors.to(m.anchors.device)
             m.anchor_grid[:] = anchors.clone().view_as(m.anchor_grid)  # for inference
             check_anchor_order(m)
             m.anchors[:] = anchors.clone().view_as(m.anchors) / m.stride.to(m.anchors.device).view(-1, 1, 1)  # loss
diff --git a/utils/torch_utils.py b/utils/torch_utils.py
index 1e631b5..5a93bd7 100644
--- a/utils/torch_utils.py
+++ b/utils/torch_utils.py
@@ -17,6 +17,8 @@ import torch.nn as nn
 import torch.nn.functional as F
 import torchvision

+import intel_extension_for_pytorch as ipex
+
 try:
     import thop  # for FLOPS computation
 except ImportError:
@@ -64,13 +66,17 @@ def select_device(device='', batch_size=None):
     # device = 'cpu' or '0' or '0,1,2,3'
     s = f'YOLOR 🚀 {git_describe() or date_modified()} torch {torch.__version__} '  # string
     cpu = device.lower() == 'cpu'
+    xpu = device.lower() == 'xpu'
     if cpu:
         os.environ['CUDA_VISIBLE_DEVICES'] = '-1'  # force torch.cuda.is_available() = False
+    elif xpu:  # non-cpu device requested
+        os.environ['CUDA_VISIBLE_DEVICES'] = '-1'  # force torch.cuda.is_available() = False
+        assert torch.xpu.is_available(), f'XPU unavailable, invalid device {device} requested'  # check availability
     elif device:  # non-cpu device requested
         os.environ['CUDA_VISIBLE_DEVICES'] = device  # set environment variable
         assert torch.cuda.is_available(), f'CUDA unavailable, invalid device {device} requested'  # check availability

-    cuda = not cpu and torch.cuda.is_available()
+    cuda = not cpu and not xpu and torch.cuda.is_available()
     if cuda:
         n = torch.cuda.device_count()
         if n > 1 and batch_size:  # check that batch_size is compatible with device_count
@@ -79,11 +85,19 @@ def select_device(device='', batch_size=None):
         for i, d in enumerate(device.split(',') if device else range(n)):
             p = torch.cuda.get_device_properties(i)
             s += f"{'' if i == 0 else space}CUDA:{d} ({p.name}, {p.total_memory / 1024 ** 2}MB)\n"  # bytes to MB
+            s += f"{'' if i == 0 else space}CUDA:{d} ({p.name}, {p.total_memory / 1024 ** 2}MB)\n"  # bytes to MB
+    elif xpu:
+        s += 'XPU\n'
     else:
         s += 'CPU\n'

     logger.info(s.encode().decode('ascii', 'ignore') if platform.system() == 'Windows' else s)  # emoji-safe
-    return torch.device('cuda:0' if cuda else 'cpu')
+    if cuda:
+        return torch.device('cuda:0')
+    elif xpu:
+        return torch.device('xpu')
+    else:
+        return torch.device('cpu')


 def time_synchronized():
@@ -371,4 +385,4 @@ class TracedModel(nn.Module):
     def forward(self, x, augment=False, profile=False):
         out = self.model(x)
         out = self.detect_layer(out)
-        return out
\ No newline at end of file
+        return out
使用如下命令使得补丁文件生效:
patch -p1 < yolov7_xpu.patch同样地,配置文件总的一些内容也需要进行相应的修改。比如,需要生成包含如下内容的配置文件,并保存在“data/pothole.yaml”路径下:
## content of data/pothole.yaml ##
train: ../pothole_dataset/images/train
val: ../pothole_dataset/images/valid
test: ../pothole_dataset/images/test

# Classes
nc: 1  # number of classes
names: ['pothole']  # class names
## content of data/pothole.yaml ##
以下配置文件中的相关内容需要被修改:
## modify "nc: 80" to "nc: 1" in cfg/training/yolov7_pothole-tiny.yaml ##使用如下命令使修改生效:
cp cfg/training/yolov7-tiny.yaml cfg/training/yolov7_pothole-tiny.yaml4. 下载yolov7-tiny 模型
我们下载如下的yolov7-tiny模型,为下一步在自定义数据集上训练做好准备。
wget https://github.com/WongKinYiu/yolov7/releases/download/v0.1/yolov7-tiny.pt5. 在自定义数据集上训练模型
使用如下命令在英特尔独立显卡上执行模型训练:
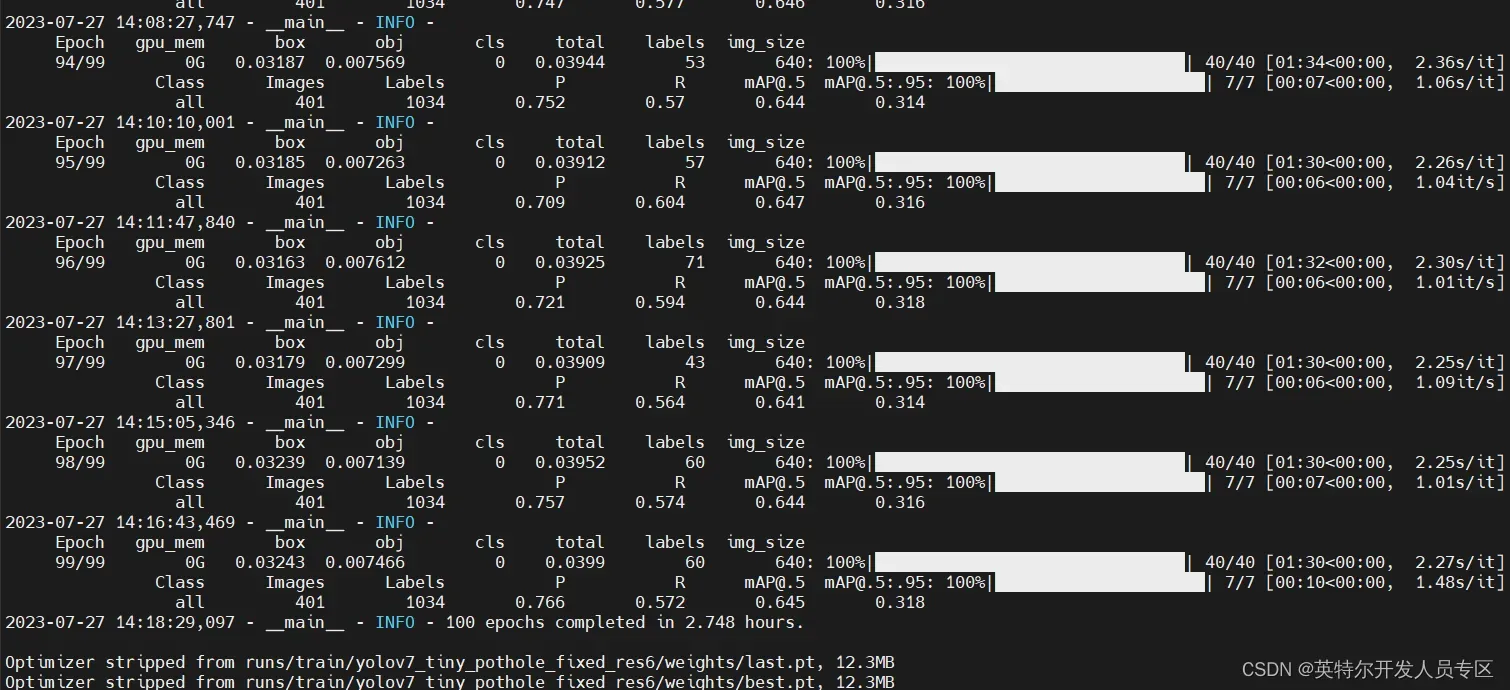
python train.py --epochs 50 --workers 4 --device xpu --batch-size 32 --data data/pothole.yaml --img 640 640 --cfg cfg/training/yolov7_pothole-tiny.yaml --weights 'yolov7-tiny.pt' --name yolov7_tiny_pothole_fixed_res --hyp data/hyp.scratch.tiny.yaml训练过程如下图所示:

训练完成后,具有最佳精度的模型权重将保存在“runs/train/yolov7_tiny_pothole_fixed_res/weights/best.pt”路径下。
到此,已完成在视频AI计算盒上训练YOLOv7模型。以上步骤的详细过程,可参考GitHub – zhuo-yoyowz/training-deployment-dGPU: A deep learning pipeline including model training with IPEX and deployment with OpenVINO on Intel dGPU
下一篇,我们将接着介绍基于已训练好的YOLOv7模型,使用OpenVINO实现模型的优化和部署。
推荐阅读:
关于英特尔OpenVINOTM开源工具套件的详细资料,包括其中我们提供的三百多个经验证并优化的预训练模型的详细资料,请您点击https://www.intel.com/content/www/us/en/developer/tools/openvino-toolkit/overview.html
除此之外,为了方便大家了解并快速掌握OpenVINOTM的使用,我们还提供了一系列开源的Jupyter notebook demo。运行这些notebook,就能快速了解在不同场景下如何利用OpenVINOTM实现一系列、包括计算机视觉、语音及自然语言处理任务。OpenVINOTM notebooks的资源可以在Github这里下载安装:https://github.com/openvinotoolkit/openvino_notebooks 。
关于原基科技(原基科技 (easy-base.com.cn))
深圳市原基科技有限公司,坐落于深圳科技新区的光明新区,专注于嵌入式主板和工控电脑、AI盒子、边缘计算服务器的研发、定制以及解决方案,是一家集研发、生产、销售、服务为一体的国家高新技术型企业,致力于为大数据、物联网、人工智能的发展提供解决方案。
主要核心骨干均为从事本行业10年以上的资深人员,依据丰富的经验和ISO9001体系的指导,设立了运营部、产品部、研发部、供应链、品质部等,具备了主板的研发设计、生产线的DIP、SMT以及整机的组装测试的能力。目前拥有20多项自主知识产权, 获评为国家高新技术企业且通ISO9001认证。
主要业务涉及智慧社区、智慧园区、智慧零售、智慧教育、智慧办公、智慧安防、智慧工业等领域;凭借灵活、快速响应的特点,得到了客户的大量认可。
通知和免责声明
Intel技术可能需要启用硬件、软件或服务激活。
任何产品或组件都不能绝对安全。
您的成本和结果可能有所不同。
©英特尔公司。Intel、Intel徽标和其他Intel标志是Intel Corporation或其子公司的商标。其他名称和品牌可能被称为他人的财产。
文章出处登录后可见!
