文章目录
- 1、前言
- 2、模型简介
- 3、代码解析
- 4、总结
1、前言
继lift-splat-shoot之后,纯视觉BEV感知又有了新的进展,如旷视科技、华中理工和西安交大提出来的BEVDepth。本文首先会对BEVDepth方法进行简要说明,后面会结合阅读代码过程中的理解对整个流程进行详细的说明,尤其是voxel_pooling的实现。
repo :https://github.com/Megvii-BaseDetection/BEVDepth
paper:https://arxiv.org/pdf/2206.10092
欢迎进入BEV感知交流群,一起解决学习过程发现的问题,可以加v群:Rex1586662742,q群:468713665。
2、模型简介
常见的自底向上方法的会显示的估计每个特征点的距离,但是这些距离是隐式学习的,在BEVDepth中会利用lidar的点云来监督预测出来的深度,使得预测的距离更加接近真实值。此外,考虑到相机外参可能会对结果进行干扰,文章增加一个网络来学习相机参数,作为注意力权重作用于图像和深度特征。同时,利用cuda实现了高效的体素池化操作。下面为论文中的网络结构图。
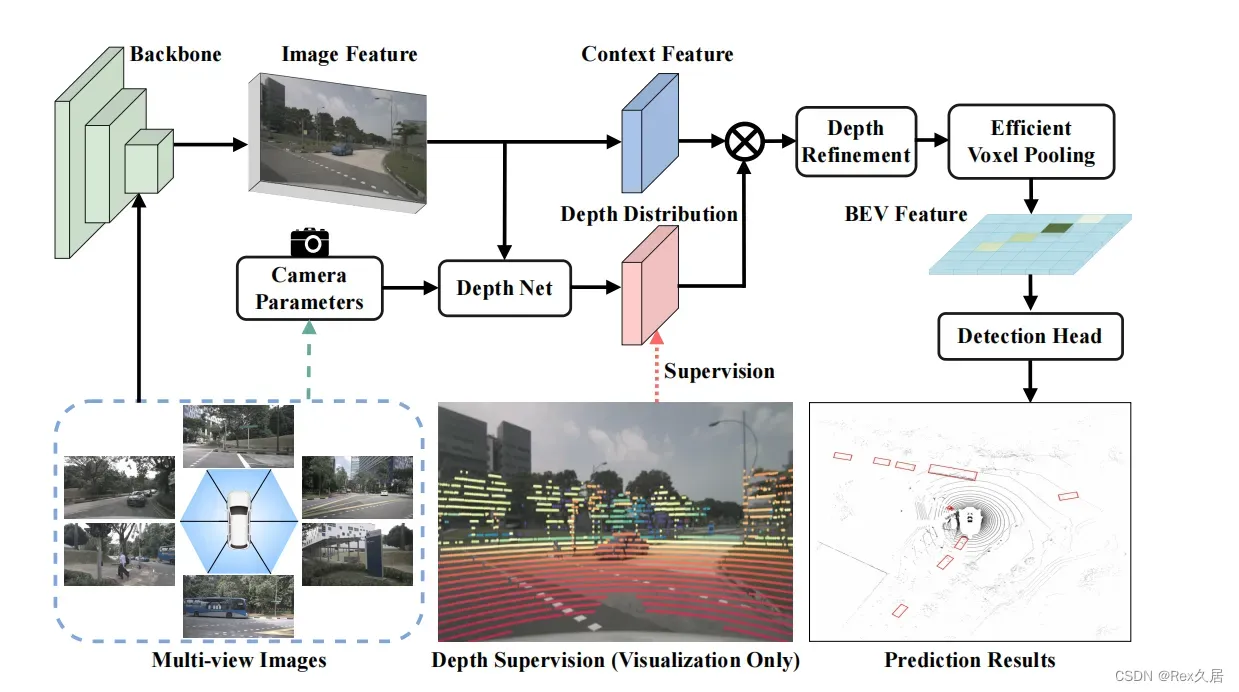
从左下角出发,一直到右下角结束,大体可以分为四个部分:环视图片特征提取、深度特征预测、Voxel Pooling和Detection Head,BEVDepth论文的关键深度特征提取以及Voxel Pooling这两个部分,因此下面将会针对这两个部分的代码进行说明。
3、代码解析
下面的代码是基本上是按照forward的顺序进行的,会对关键代码进行解释以及shape的标注。
1、bevdepth/models/base_bev_depth.py
class BaseBEVDepth(nn.Module):
    def forward(...):
        if self.is_train_depth and self.training:
            # 训练时 用Lidar的深度来监督 depth_pred
            x, depth_pred = self.backbone(...)
            preds = self.head(x)
        else:
            # x:[1, 160, 128, 128] 关键帧+过渡帧的 bev特征
            x = self.backbone(x, mats_dict, timestamps)
            # -> bevdepth/layers/backbones/base_lss_fpn.py
            # 解码
            preds = self.head(x)   # 参考centerpoint
2、bevdepth/layers/backbones/base_lss_fpn.py
class BaseLSSFPN(nn.Module):
def __init__(...):
...
def forward(...):
"""
Args:
sweep_imgs:[1, 2, 6, 3, 256, 704],关键帧以及过渡帧图片
mats_dict(dict):
sensor2ego_mats:相机坐标系->车辆坐标系
intrin_mats:相机内参
ida_mats:图像数据增强矩阵
sensor2sensor_mats:key frame camera to sweep frame camera,关键帧到过渡帧的变化矩阵
bda_mat:bev特征增强矩阵
"""
# 提取关键帧的BEV特征 key_frame_res:[1, 80, 128, 128])
key_frame_res = self._forward_single_sweep(...)
for sweep_index in range(1, num_sweeps):
# 提取过渡帧的bev特征
feature_map = self._forward_single_sweep(...)
ret_feature_list.append(feature_map)
if is_return_depth:
return torch.cat(ret_feature_list, 1), key_frame_res[1]
return torch.cat(ret_feature_list, 1)
def _forward_single_sweep(...):
# 提取环视图片特征
# img_feats:[1, 1, 6, 512, 16, 44]
img_feats = self.get_cam_feats(sweep_imgs)
source_features = img_feats[:, 0, ...]
# 提取Depth以及context
depth_feature = self._forward_depth_net(...)
# 预测的距离分布 depth:[6, 112, 16, 44]
depth = depth_feature[:, :self.depth_channels].softmax(1)
# 对应论文中的 Context Feature * Depth Distribution 操作
img_feat_with_depth = ... #
# 车辆坐标系下的视锥坐标点 geom_xyz:[1, 6, 112, 16, 44, 3]
geom_xyz = self.get_geometry(...)
# 将车辆坐标系的原点移动到左下角
geom_xyz = ((geom_xyz - (self.voxel_coord - self.voxel_size / 2.0)) /
self.voxel_size).int()
# 获得最终BEV特征 [1, 80, 128, 128]
feature_map = voxel_pooling(...)
# -> bevdepth/ops/voxel_pooling/voxel_pooling.py
if is_return_depth:
# 训练时需要返回预测的深度,用lidar信号进行监督
return feature_map.contiguous(), depth
return feature_map.contiguous()
def _forward_depth_net(...):
return self.depth_net(feat, mats_dict)
def get_geometry(...):
"""Transfer points from camera coord to ego coord
Args:
rots(Tensor): Rotation matrix from camera to ego.
trans(Tensor): Translation matrix from camera to ego.
intrins(Tensor): Intrinsic matrix.
post_rots_ida(Tensor): Rotation matrix for ida.
post_trans_ida(Tensor): Translation matrix for ida
post_rot_bda(Tensor): Rotation matrix for bda.
"""
# self.frustum:[112, 16, 44, 4] 视锥
points = self.frustum
# 乘以图像增强的逆矩阵
points = ida_mat.inverse().matmul(points.unsqueeze(-1))
# lamda * [x,y,1] = [lamda*x,lamda*y,lamda]
# 像素坐标系转相机坐标系
points = torch.cat(...)
# cam_to_ego
combine = sensor2ego_mat.matmul(torch.inverse(intrin_mat))
points = combine.view(...)
return points
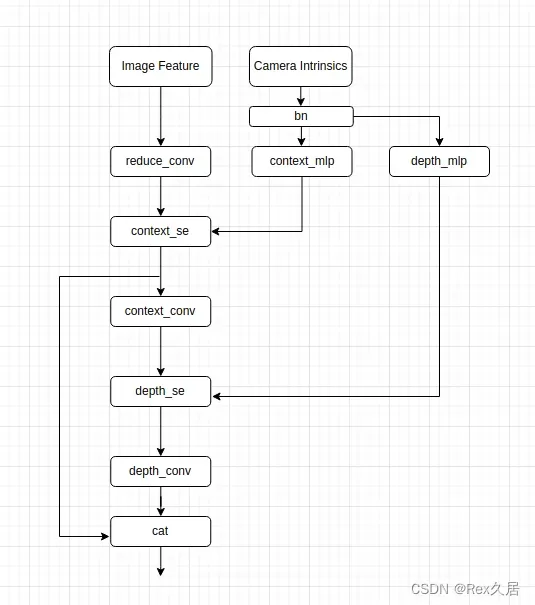
# 对应Depth Module,由与论文中没有给出该模块的流程图于是按照代码逻辑绘制了一个
class DepthNet(nn.Module):
def __init__(...):
...
def forward(...):
# 当前帧的相机参数
mlp_input = ...
# Norm
mlp_input = self.bn(mlp_input.reshape(-1, mlp_input.shape[-1]))
# 相机参数作为 context的注意力系数
context_se = self.context_mlp(mlp_input)[..., None, None]
# 注意力操作
context = self.context_se(x, context_se)
# FC
context = self.context_conv(context)
# 相机参数作为 Depth的注意力系数
depth_se = self.depth_mlp(mlp_input)[..., None, None]
# 注意力操作
depth = self.depth_se(x, depth_se)
# FC
depth = self.depth_conv(depth)
return torch.cat([depth, context], dim=1)
Depth Module
3、bevdepth/ops/voxel_pooling/voxel_pooling.py
class VoxelPooling(...):
    def forward(...):
        """
        Args:
            geom_xyz:在车辆坐标系下的视锥点,x、y轴的范围为0~127
            input_features:环视图片特征
            voxel_num: 128 * 128 * 80
        """
        # 为每个视锥点分配一个thread,将在bev特征下,处于相同位置的特征点对应的特征向量相加,具体可以看下方的核函数
        voxel_pooling_ext.voxel_pooling_forward_wrapper(...)
        # -> bevdepth/ops/voxel_pooling/src/voxel_pooling_forward_cuda.cu
        # 最终就得到BEV特征 output_features
        return output_features
4、bevdepth/ops/voxel_pooling/src/voxel_pooling_forward_cuda.cu
由于voxel_pooling代码讲解的资料比较少,根据对下面的代码的理解绘制了voxel_pooling的示意图,在下方的代码注释中会对这个图进行说明。
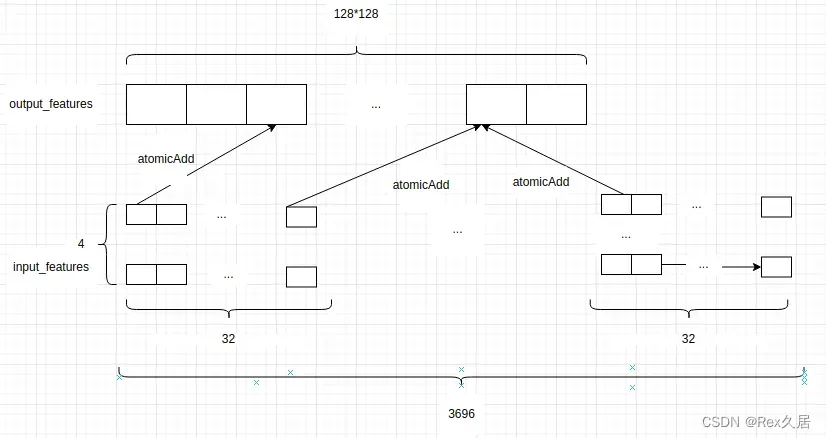
void voxel_pooling_forward_kernel_launcher(...){
    dim3 blocks(DIVUP(batch_size * num_points, THREADS_PER_BLOCK)); // 473088 / 128 = 3696 个 block ,排布为 3696*1
    dim3 threads(THREADS_BLOCK_X, THREADS_BLOCK_Y);  // 每个 block中 有 128 个 thread,排布为 32 * 4
    voxel_pooling_forward_kernel<<<blocks, threads, 0, stream>>>(
      batch_size, num_points, num_channels, num_voxel_x, num_voxel_y,
      num_voxel_z, geom_xyz, input_features, output_features, pos_memo);
}

__global__ void voxel_pooling_forward_kernel(...) {
  /*
  Args:
    batch_size:当前block在哪个batch ,假定batchsize==1
    num_points:视锥点个数,473088
    num_channels:特征维度,80
    num_voxel_x:bev特征x大小
    num_voxel_y:bev特征y大小
    geom_xyz:视锥坐标的指针,[1, 473088, 3]
    input_features:输入特征图的指针,[1, 473088, 80]
    output_features:输出特征图的指针,[1, 128, 128, 80]
    pos_memo:记录x,y坐标,[1, 473088, 3]
  */
  # 所有thread 同时计算
  const int bidx = blockIdx.x;   // bidx,当前block在当前grid中x维度的索引
  const int tidx = threadIdx.x;  // tidx,当前thread在当前block中x维度的索引
  const int tidy = threadIdx.y;  // tidy,当前thread在当前block中y维度的索引
  const int sample_dim = THREADS_PER_BLOCK; // sample_dim 128 ,每个block中的thread数量
  const int idx_in_block = tidy * THREADS_BLOCK_X + tidx;   // 当前thread在当前block中的全局索引

  const int block_sample_idx = bidx * sample_dim; //当前block在当前grid中的全局索引
  const int thread_sample_idx = block_sample_idx + idx_in_block; // 当前thread在当前grid中的全局索引

  const int total_samples = batch_size * num_points; // 总thread数量

  __shared__ int geom_xyz_shared[THREADS_PER_BLOCK * 3]; // 128 * 3 共享内存,记录一个block中所有点的坐标

  if (thread_sample_idx < total_samples) {
    // 将一个block中的所有视锥点的坐储存在共享内存geom_xyz_shared中,(所有block同时进行)
    const int sample_x = geom_xyz[thread_sample_idx * 3 + 0];
    const int sample_y = geom_xyz[thread_sample_idx * 3 + 1];
    const int sample_z = geom_xyz[thread_sample_idx * 3 + 2];
    geom_xyz_shared[idx_in_block * 3 + 0] = sample_x;
    geom_xyz_shared[idx_in_block * 3 + 1] = sample_y;
    geom_xyz_shared[idx_in_block * 3 + 2] = sample_z;
    if ((sample_x >= 0 && sample_x < num_voxel_x) &&
        (sample_y >= 0 && sample_y < num_voxel_y) &&
        (sample_z >= 0 && sample_z < num_voxel_z)) {
      pos_memo[thread_sample_idx * 3 + 0] = thread_smple_idx / num_points; // 将z轴变为0
      pos_memo[thread_sample_idx * 3 + 1] = sample_y;  // 保存视锥y坐标
      pos_memo[thread_sample_idx * 3 + 2] = sample_x;  // 保存视锥x坐标
    }
  }

  __syncthreads();
  // 可以分为两个步骤,1、先找到当前视锥点在output_features,也就是BEV特征下索引,再找到当前视锥点在input_features中的索引,然后再将两个位置的特征进行相加,由于input_features可能出现多个索引对应于output_features中的同一个索引,必须使用原子加 atomicAdd,可以参考上方的示意图
  for (int i = tidy;
       i < THREADS_PER_BLOCK && block_sample_idx + i < total_samples;
       i += THREADS_BLOCK_Y) {
    const int sample_x = geom_xyz_shared[i * 3 + 0];
    const int sample_y = geom_xyz_shared[i * 3 + 1];
    const int sample_z = geom_xyz_shared[i * 3 + 2];
    if (sample_x < 0 || sample_x >= num_voxel_x || sample_y < 0 ||
        sample_y >= num_voxel_y || sample_z < 0 || sample_z >= num_voxel_z) {
      continue;
    }
    const int batch_idx = (block_sample_idx + i) / num_points;
    for (int j = tidx; j < num_channels; j += THREADS_BLOCK_X) {
      atomicAdd(&output_features[(batch_idx * num_voxel_y * num_voxel_x +sample_y * num_voxel_x + sample_x) *num_channels +j],input_features[(block_sample_idx + i) * num_channels + j]);
    }
  }
}
4、总结
本次针对BEVDepth的特性进行学习,主要是针对深度预测模块以及Voxel_pooling模块进行了分析,了解完BEVDepth之后,就可以对旷视的另一篇论文BEVstereo进行学习了,希望有更多的人加入进来,一起学习、讨论。
文章出处登录后可见!