原文标题 :Borderless Tables Detection with Deep Learning and OpenCV
使用深度学习和 OpenCV 进行无边界表检测
构建自己的对象检测器并将图像中的半结构化数据块转换为机器可读文本的方法

Document parsing
文档解析是将信息转换为有价值的业务数据的初始步骤。该信息通常以表格格式存储在商业文档中,或者偶然存储在没有独特图形边界的数据块中。无边界表格可能有助于简化我们人类对半结构化数据的视觉感知。从机器阅读的角度来看,这种在页面上呈现信息有很多缺点,使得很难将属于假定表结构的数据与周围的文本上下文分开。[0]
表格数据提取作为一项业务挑战可能有几个临时或基于启发式规则的解决方案,如果表格布局或样式略有不同,这些解决方案肯定会失败。在大规模上,人们应该使用更通用的方法来识别图像中的表格结构,更具体地说,是一种基于深度学习的对象检测方法。
本教程的范围:
- 基于深度学习的目标检测
- TF2 对象检测 API 的安装和设置
- Data preparation
- Model configuration
- 模型训练和保存
- 真实图像中的表格检测和单元格识别
基于深度学习的目标检测
著名的 CV 研究员 Adrian Rosebrock 在他的“深度学习对象检测的温和指南”中指出:“对象检测,无论是通过深度学习还是其他计算机视觉技术执行,都建立在图像分类之上,并寻求精确定位一个区域对象出现的地方”。正如他所建议的,构建自定义对象检测器的一种方法是选择任何分类器,并在其前面使用算法来选择和提供可能包含对象的图像区域。在此方法中,您可以自由决定是使用传统的 ML 算法进行图像分类(使用或不使用 CNN 作为特征提取器)还是训练简单的神经网络来处理任意大型数据集。尽管其效率得到证实,但这种称为 R-CNN 的两阶段目标检测范式仍然依赖于大量计算,不适合实时应用。[0][1][2]
在上述帖子中进一步说,“另一种方法是将预训练的分类网络视为多组件深度学习对象检测框架(例如 Faster R-CNN、SSD 或 YOLO)中的基础(骨干)网络)”。因此,您将受益于其完整的端到端可训练架构。
无论选择什么,它都会让您进一步遇到重叠边界框的问题。在下文中,我们将涉及为此目的执行非最大抑制。
同时,请参考任意新类的对象检测器的迁移学习流程图(参见交互式视图):[0]

由于它更快、更简单、更准确,因此第二种方法已被广泛用于商业和科学论文中的表格结构识别。例如,您可以轻松找到使用 YOLO、RetinaNet、Cascade R-CNN 和其他框架从 PDF 文档中提取表格数据的实现。[0][1][2]
继续学习本教程,您将学习如何使用 TensorFlow (TF2) 对象检测 API 等工具,使用预先训练的最先进模型轻松构建自定义对象检测器。
Before you start
请注意,这不是对深度学习对象检测的详尽介绍,而是对与 TF2 对象检测 API(和其他工具)进行交互以解决显着业务问题(例如无边界表检测)的分阶段描述特定的开发环境(Anaconda/Win10)。在本文的其余部分,我们将比其他方面更详细地介绍建模过程的某些方面和结果。尽管如此,您仍会找到基本的代码示例来进行我们的实验。要继续,您应该安装 Anaconda 和 Tesseract,并将 protobuf 下载并添加到 PATH。
TF2 对象检测 API 的安装和设置
在您选择的路径下创建一个新文件夹,我们将在下文中将其称为“项目的根文件夹”。从您的终端窗口逐一运行以下命令:
# from <project’s root folder>
conda create -n <new environment name> \
python=3.7 \
tensorflow=2.3 \
numpy=1.17.4 \
tf_slim \
cython \
gitconda activate <new environment name>git clone https://github.com/tensorflow/models.gitpip install git+https://github.com/philferriere/cocoapi.git#subdirectory=PythonAPIcd models\research
# from <project’s root folder>\models\researchprotoc object_detection\protos\*.proto — python_out=.copy object_detection\packages\tf2\setup.py .python setup.py installpython object_detection\builders\model_builder_tf2_test.pyconda install imutils pdf2image beautifulsoup4 typeguardpip install tf-imagecopy object_detection\model_main_tf2.py ..\..\workspace\.copy object_detection\exporter_main_v2.py ..\..\workspace\.cd ..\..
它将核心和一些帮助程序库安装到您的本地环境中,以使用 TF2 对象检测 API 并处理您的训练数据集。从这一步开始,您应该能够从 TF2 Model Garden 下载预训练模型,并从中获取相应预训练类的推论。[0]
Data preparation
我希望你到目前为止已经成功了!请记住,我们的最终目标是使用预训练模型执行迁移学习,以检测单个“无边界”类,该模型在初始训练时并不知道。如果您研究过我们的迁移学习流程图,您应该注意到我们整个过程的起点是一个数据集,无论是否带注释。如果您需要注释,有大量可用的解决方案。选择一个可以为您提供 XML 注释的,与我们的示例兼容的。[0]
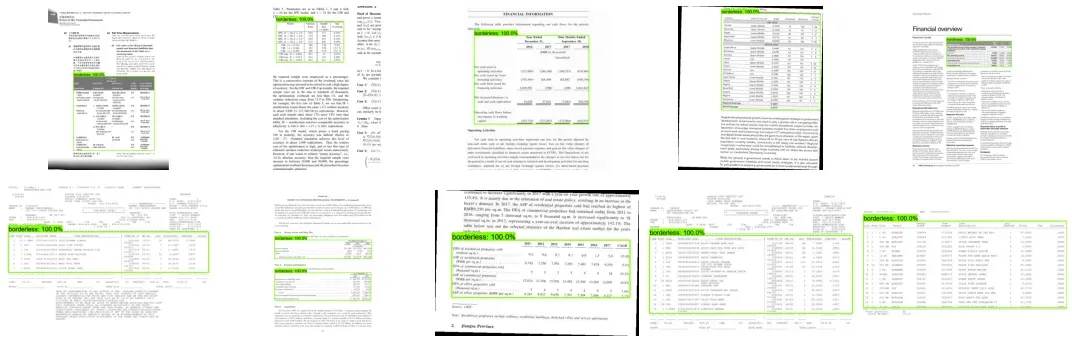
我们拥有的带注释的数据越多越好(重要的是:这篇文章的所有表格图像都是从像这个这样的开放数据源中选择的,并由作者进行了注释/重新注释)。但是,一旦您尝试手动数据标记,您就会明白这项工作是多么乏味。不幸的是,用于图像增强的流行 python 库都没有处理选定的边界框。在不增加收集和注释新数据的高成本的情况下将初始数据集相乘符合我们的利益。这就是 tf-image 包将变得方便的情况。[0][1]
import os
import lxml.etree as et
import numpy as np
from imutils import paths
from bs4 import BeautifulSoup
import tensorflow as tf
from tf_image.application.augmentation_config import (
    AugmentationConfig,
    AspectRatioAugmentation,
    ColorAugmentation)
from tf_image.application.tools import random_augmentations
import config

aug_config = AugmentationConfig()
aug_config.color = ColorAugmentation.NONE
aug_config.crop = True
aug_config.distort_aspect_ratio = AspectRatioAugmentation.NONE
aug_config.quality = True
aug_config.erasing = False
aug_config.rotate90 = False
aug_config.rotate_max = 5
aug_config.flip_vertical = False
aug_config.flip_horizontal = False
aug_config.padding_square = False

image_paths = list(paths.list_images(config.TRAIN_SET))

for i, image_path in enumerate(image_paths):
    # get file with annotations
    filename = image_path.split(os.path.sep)[-1]
    filename = filename[:filename.rfind('.')]
    ANNOT_PATH = os.path.sep.join([config.TRAIN_SET,
                                   "{}.xml".format(filename)])

    CONTENTS = str(open(ANNOT_PATH).read())
    soup = BeautifulSoup(CONTENTS, 'xml')

    w = int(soup.width.string)
    h = int(soup.height.string)

    image_encoded = tf.io.read_file(image_path)
    image = tf.image.decode_jpeg(image_encoded)

    # original bbox in absolute coordinates
    bboxes = []
    for o in soup.find_all("object"):
        xMin = int(o.find("xmin").string)
        yMin = int(o.find("ymin").string)
        xMax = int(o.find("xmax").string)
        yMax = int(o.find("ymax").string)
        bboxes.append([yMin, xMin, yMax, xMax])

    bboxes = np.array(bboxes, dtype=np.float32)

    # original bbox in relative coordinates [0...1]
    bboxes /= np.stack([h, w, h, w])

    for t in range(config.NUM_AUG):
        image_augmented, bboxes_augmented = random_augmentations(
            image,
            aug_config,
            bboxes=tf.constant(bboxes)
        )

        image_augmented_encoded = tf.image.encode_png(image_augmented)

        FILENAME_AUG = '{}_aug_{}.jpg'.format(filename, t)

        tf.io.write_file(os.path.sep.join([config.TRAIN_SET,
                                           FILENAME_AUG]),
                         image_augmented_encoded)

        # augmented bbox to absolute coordinates
        bboxes_abs = ((bboxes_augmented.numpy() *
                       np.stack([tf.shape(image_augmented)[0],
                                 tf.shape(image_augmented)[1],
                                 tf.shape(image_augmented)[0],
                                 tf.shape(image_augmented)[1]]))
                      .astype(int))

        # slightly change order from yMin, xMin, yMax, xMax
        # to regular xMin, yMin, xMax, yMax
        bboxes_abs = bboxes_abs[:, [1, 0, 3, 2]]

        # write augmented bbox to annotation file
        for k, o in enumerate(soup.find_all("object")):
            strings = [s for s in o.bndbox.strings if s.isdigit()]
            for j, s in enumerate(strings):
                s.replace_with(str(bboxes_abs[k, j]))

        soup.filename.string = FILENAME_AUG

        # prettify xml file
        xml_string = et.fromstring(soup.decode_contents())
        xml_styles = et.fromstring(str(open(config.XML_STYLE).read()))

        transformer = et.XSLT(xml_styles)
        xml_prettified = transformer(xml_string)

        with open(os.path.sep.join([config.TRAIN_SET,
                                    '{}_aug_{}.xml'.format(filename, t)]),
                  'w') as f:
            f.write(str(xml_prettified))
上述脚本将随机变换原始图像以及对象的边界框,并将新图像和相应的 XML 文件保存到磁盘。这就是我们的数据集在三倍扩展后的样子:
接下来的步骤将包括将数据拆分为训练集和测试集。基于 TF2 对象检测 API 的模型需要一种用于所有输入数据的特殊格式,称为 TFRecord。您会在 Github 存储库中找到相应的脚本来拆分和转换您的数据。[0]
Model configuration
在这一步,我们将创建一个标签映射文件 (.pbtxt) 以将我们的类标签 (‘borderless’) 链接到某个整数值。 TF2 对象检测 API 需要此文件用于训练和检测目的:
item {
id: 1
name: ‘borderless’
}
实际的模型配置发生在相应的 pipeline.config 文件中。您可以阅读模型配置介绍,并决定是手动配置文件还是通过运行 Github 存储库中的脚本来配置文件。[0][1]
现在,您的项目的根文件夹可能如下所示:
📦borderless_tbls_detection
┣ 📂images
┃ ┣ 📂processed
┃ ┃ ┣ 📂all_annots
┃ ┃ ┃ ┗ 📜…XML
┃ ┃ ┗ 📂all_images
┃ ┃ ┃ ┗ 📜…jpg
┃ ┣ 📂splitted
┃ ┃ ┣ 📂test_set
┃ ┃ ┃ ┣ 📜…jpg
┃ ┃ ┃ ┗ 📜…XML
┃ ┃ ┣ 📂train_set
┃ ┃ ┃ ┣ 📜…jpg
┃ ┃ ┃ ┗ 📜…XML
┃ ┃ ┗ 📂val_set
┃ ┗ 📜xml_style.XML
┣ 📂models
┃ ┗ 📂…
┣ 📂scripts
┃ ┣ 📜…py
┣ 📂train_logs
┣ 📂workspace
┃ ┣ 📂data
┃ ┃ ┣ 📜label_map.pbtxt
┃ ┃ ┣ 📜test.csv
┃ ┃ ┣ 📜test.record
┃ ┃ ┣ 📜train.csv
┃ ┃ ┣ 📜train.record
┃ ┃ ┣ 📜val.csv
┃ ┃ ┗ 📜val.record
┃ ┣ 📂models
┃ ┃ ┗ 📂efficientdet_d1_coco17_tpu-32
┃ ┃ ┃ ┗ 📂v1
┃ ┃ ┃ ┃ ┗ 📜pipeline.config
┃ ┣ 📂pretrained_models
┃ ┃ ┗ 📂datasets
┃ ┃ ┃ ┣ 📂efficientdet_d1_coco17_tpu-32
┃ ┃ ┃ ┃ ┣ 📂checkpoint
┃ ┃ ┃ ┃ ┃ ┣ 📜checkpoint
┃ ┃ ┃ ┃ ┃ ┣ 📜ckpt-0.data-00000-of-00001
┃ ┃ ┃ ┃ ┃ ┗ 📜ckpt-0.index
┃ ┃ ┃ ┃ ┣ 📂saved_model
┃ ┃ ┃ ┃ ┃ ┣ 📂assets
┃ ┃ ┃ ┃ ┃ ┣ 📂variables
┃ ┃ ┃ ┃ ┃ ┃ ┣ 📜variables.data-00000-of-00001
┃ ┃ ┃ ┃ ┃ ┃ ┗ 📜variables.index
┃ ┃ ┃ ┃ ┃ ┗ 📜saved_model.pb
┃ ┃ ┃ ┃ ┗ 📜pipeline.config
┃ ┃ ┃ ┗ 📜efficientdet_d1_coco17_tpu-32.tar.gz
┃ ┣ 📜exporter_main_v2.py
┃ ┗ 📜model_main_tf2.py
┣ 📜config.py
┗ 📜setup.py
模型训练和保存
我们已经做了很多工作才能到达这里并准备好开始培训。以下是如何做到这一点:
# from <project’s root folder>
tensorboard — logdir=<logs folder>set NUM_TRAIN_STEPS=1000set CHECKPOINT_EVERY_N=1000set PIPELINE_CONFIG_PATH=<path to model’s pipeline.config>set MODEL_DIR=<logs folder>set SAMPLE_1_OF_N_EVAL_EXAMPLES=1set NUM_WORKERS=1python workspace\model_main_tf2.py \
 — pipeline_config_path=%PIPELINE_CONFIG_PATH% \
 — model_dir=%MODEL_DIR% \
 — checkpoint_every_n=%CHECKPOINT_EVERY_N% \
 — num_workers=%NUM_WORKERS% \
 — num_train_steps=%NUM_TRAIN_STEPS% \
 — sample_1_of_n_eval_examples=%SAMPLE_1_OF_N_EVAL_EXAMPLES% \
 — alsologtostderr# (optionally in parallel terminal window)
python workspace\model_main_tf2.py \
 — pipeline_config_path=%PIPELINE_CONFIG_PATH% \
 — model_dir=%MODEL_DIR% \
 — checkpoint_dir=%MODEL_DIR%
现在您可以在浏览器中通过 http://localhost:6006 监控训练过程:[0]

要在训练完成后导出模型,只需运行以下命令:
# from <project’s root folder>
python workspace\exporter_main_v2.py \
 — input_type=image_tensor \
 — pipeline_config_path=%PIPELINE_CONFIG_PATH% \
 — trained_checkpoint_dir=%MODEL_DIR% \
 — output_directory=saved_models\efficientdet_d1_coco17_tpu-32
图像中的表格检测和单元格识别
NMS and IoU
由于我们保存了新调整的模型,我们可以开始检测文档中的表格。前面我们提到了物体检测系统的一个不可避免的问题——重叠边界框。考虑到我们正在处理的无边界表格的过度分割性质,我们的模型偶尔会为单个对象输出比您预期更多的边界框。毕竟,这表明我们的物体检测器正在正确发射。为了处理重叠边界框(指同一个对象)的移除,我们可以使用非最大抑制。[0]
这里是我们的检测器的推论最初和执行非最大抑制后的样子:

看起来我们已经成功解决了预测重叠矩形包围对象的问题,但我们的检测仍然没有达到真实边界框。这会发生,因为没有模型是完美的。我们可以使用交并比 (IoU) 比率来衡量检测器的准确度。作为分子,我们计算预测边界框和真实边界框之间的重叠区域。作为分母,我们计算预测边界框和真实边界框所包含的区域。 IoU 得分 > 0.5 通常被认为是“良好”的预测 [Rosenbrock, 2016]。[0]
对于我们测试集中的一些图像,我们有以下指标:

细胞识别和 OCR
这些将是我们三部分算法的最后步骤:在检测到 (1) 表之后,我们将 (2) 使用 OpenCV 识别其单元格(因为表是无边界的)并将它们彻底分配到适当的行和列, 进一步进行 (3) 通过使用 pytesseract 的光学字符识别 (OCR) 从每个分配的单元格中提取文本。
大多数细胞识别算法都是基于表格的行结构。清晰和可检测的线条对于正确识别细胞是必要的。由于我们的表格没有,我们将手动重建表格网格,在阈值和调整大小的图像上搜索白色垂直和水平间隙。这种方法有点类似于这里使用的方法。[0]
完成此步骤后,我们可以使用 OpenCV 找到轮廓(即我们的单元格边界),将它们排序并分配到类似表格的结构中:
"""Cell recognition algorithm."""
import numpy as np
import cv2
from imutils import resize

# demo document
dem = dict(
    img_path='demo\\img\\cTDaR_t10335.jpg',
    gt_boxes=np.array([[451,  67, 749, 749]]),
    in_boxes=np.array([[455,  84, 760, 785]]))

dem_wdth = dem['in_boxes'][0][3] - dem['in_boxes'][0][1]
dem_hght = dem['in_boxes'][0][2] - dem['in_boxes'][0][0]
dem_xmin = dem['in_boxes'][0][1]
dem_ymin = dem['in_boxes'][0][0]

dem_image = cv2.imread(dem['img_path'])

# detected table from document
tbl_image = dem_image[dem_ymin: dem_ymin + dem_hght,
                      dem_xmin: dem_xmin + dem_wdth]

# threshold and resize table image
tbl_gray = cv2.cvtColor(tbl_image, cv2.COLOR_BGR2GRAY)
tbl_thresh_bin = cv2.threshold(tbl_gray, 127, 255, cv2.THRESH_BINARY)[1]

R = 2.5
tbl_resized = resize(tbl_thresh_bin, width=int(tbl_image.shape[1] // R))


def get_dividers(img, axis):
    """Return array indicies of white horizontal or vertical lines."""
    blank_lines = np.where(np.all(img == 255, axis=axis))[0]
    filtered_idx = np.where(np.diff(blank_lines) != 1)[0]
    return blank_lines[filtered_idx]


dims = tbl_image.shape[0], tbl_image.shape[1]

# table mask to search for gridlines
tbl_str = np.zeros(dims, np.uint8)
tbl_str = cv2.rectangle(tbl_str, (0, 0), (dims[1] - 1, dims[0] - 1), 255, 1)

for a in [0, 1]:
    dividers = get_dividers(tbl_resized, a)
    start_point = [0, 0]
    end_point = [dims[1], dims[1]]
    for i in dividers:
        i *= R
        start_point[a] = int(i)
        end_point[a] = int(i)
        cv2.line(tbl_str,
                 tuple(start_point),
                 tuple(end_point),
                 255,
                 1)


contours, hierarchy = cv2.findContours(tbl_str,
                                       cv2.RETR_TREE,
                                       cv2.CHAIN_APPROX_SIMPLE)


def sort_contours(cnts, method="left-to-right"):
    """Return sorted countours."""
    reverse = False
    k = 0
    if method in ['right-to-left', 'bottom-to-top']:
        reverse = True
    if method in ['top-to-bottom', 'bottom-to-top']:
        k = 1
    b_boxes = [cv2.boundingRect(c) for c in cnts]
    (cnts, b_boxes) = zip(*sorted(zip(cnts, b_boxes),
                                  key=lambda b: b[1][k],
                                  reverse=reverse))
    return (cnts, b_boxes)


contours, boundingBoxes = sort_contours(contours, method='top-to-bottom')

# remove countours of the whole table
bb_filtered = [list(t) for t in boundingBoxes
               if t[2] < dims[1] and t[3] < dims[0]]

# allocate countours in table-like structure
rows = []
columns = []

for i, bb in enumerate(bb_filtered):
    if i == 0:
        columns.append(bb)
        previous = bb
    else:
        if bb[1] < previous[1] + previous[3]/2:
            columns.append(bb)
            previous = bb
            if i == len(bb_filtered) - 1:
                rows.append(columns)
        else:
            rows.append(columns)
            columns = []
            previous = bb
            columns.append(bb)
整个工作流程如图所示:

此时,我们所有的框和它们的值都按正确的顺序排序。只需要获取每个基于图像的框,通过膨胀和腐蚀为 OCR 准备,并让 pytesseract 识别包含的字符串:
Final thoughts
哎呀,走了好长一段路!我们的自定义对象检测器可以识别文档中的半结构化信息块(也称为无边界表格),以进一步将它们转换为机器可读的文本。尽管这个模型结果并不像我们预期的那么准确。因此我们有很大的改进空间:
文章出处登录后可见!