分别来用keras实现通道注意力模块和空间注意力模块。
#通道注意力机制
def channel_attention(input_feature, ratio=8):
channel_axis = 1 if K.image_data_format() == "channels_first" else -1
channel = input_feature._keras_shape[channel_axis]
shared_layer_one = Dense(channel//ratio,
activation='relu',
kernel_initializer='he_normal',
use_bias=True,
bias_initializer='zeros')
shared_layer_two = Dense(channel,
kernel_initializer='he_normal',
use_bias=True,
bias_initializer='zeros')
avg_pool = GlobalAveragePooling2D()(input_feature)
avg_pool = Reshape((1,1,channel))(avg_pool) # Reshape: width,height,depth
#assert avg_pool._keras_shape[1:] == (1,1,channel)
avg_pool = shared_layer_one(avg_pool)
#assert avg_pool._keras_shape[1:] == (1,1,channel//ratio)
avg_pool = shared_layer_two(avg_pool)
#assert avg_pool._keras_shape[1:] == (1,1,channel)
max_pool = GlobalMaxPooling2D()(input_feature)
max_pool = Reshape((1,1,channel))(max_pool)
#assert max_pool._keras_shape[1:] == (1,1,channel)
max_pool = shared_layer_one(max_pool)
#assert max_pool._keras_shape[1:] == (1,1,channel//ratio)
max_pool = shared_layer_two(max_pool)
#assert max_pool._keras_shape[1:] == (1,1,channel)
cbam_feature = Add()([avg_pool,max_pool]) # 处理后的结果相加
cbam_feature = Activation('sigmoid')(cbam_feature) # 获得各通道的权重图
if K.image_data_format() == "channels_first":
cbam_feature = Permute((3, 1, 2))(cbam_feature)
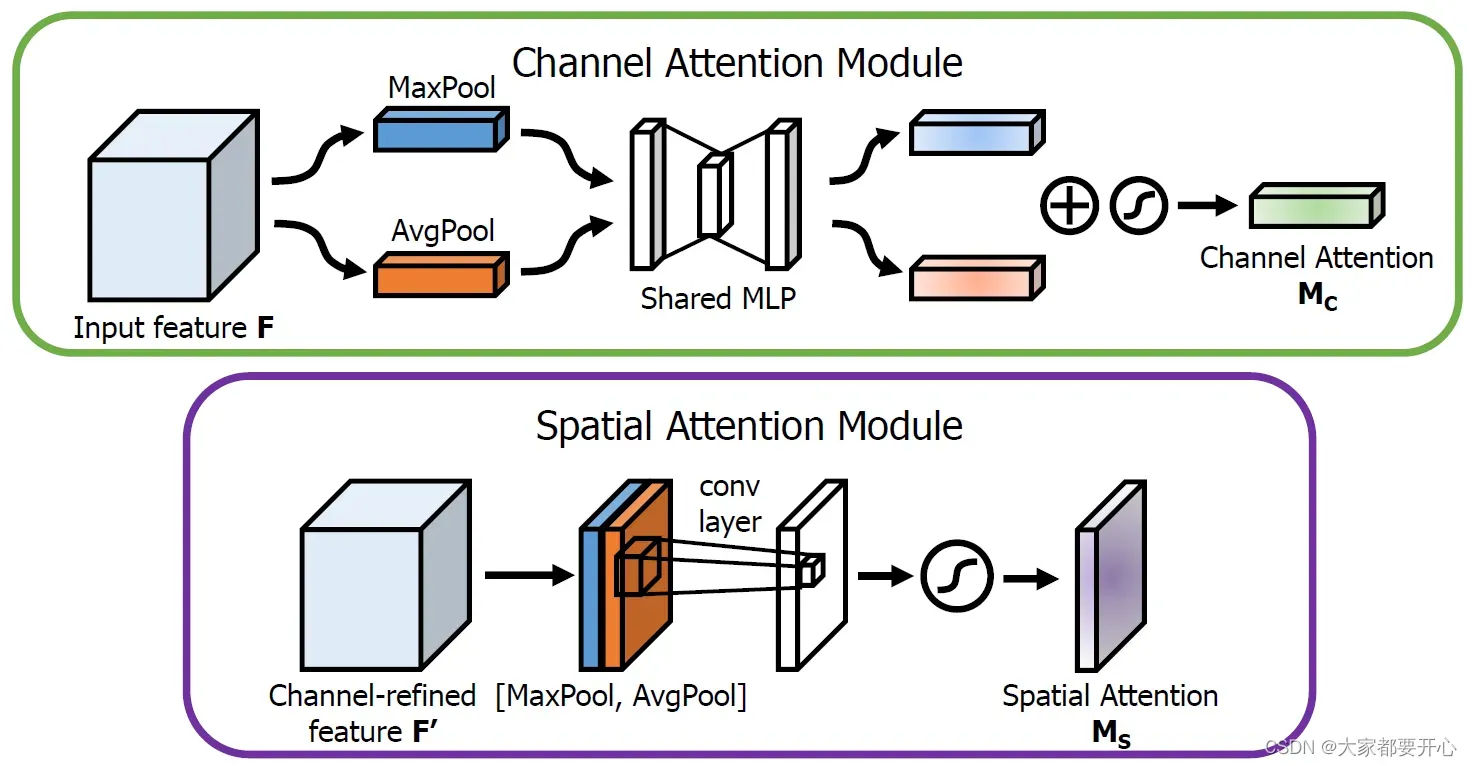
return multiply([input_feature, cbam_feature])通道注意力:将输入的featuremap,分别经过基于width和height的global max pooling 和global average pooling。
目的:保持通道数不变
"""
我们先分别进行一个通道维度的平均池化和最大池化得到两个 H×W×1 的通道描述,并将这两个描述按照通道拼接在一起;
然后,经过一个 7×7 的卷积层,激活函数为 Sigmoid,得到权重系数 Ms;
最后,拿权重系数和特征 F’ 相乘即可得到缩放后的新特征。
"""
def spatial_attention(input_feature):
	kernel_size = 7

	if K.image_data_format() == "channels_first":
		channel = input_feature._keras_shape[1]
		cbam_feature = Permute((2,3,1))(input_feature)
	else:
		channel = input_feature._keras_shape[-1]
		cbam_feature = input_feature

	avg_pool = Lambda(lambda x: K.mean(x, axis=3, keepdims=True))(cbam_feature)  # 对张量求平均值,改变第三维坐标,并保持原本维度
	#assert avg_pool._keras_shape[-1] == 1
	max_pool = Lambda(lambda x: K.max(x, axis=3, keepdims=True))(cbam_feature)
	#assert max_pool._keras_shape[-1] == 1
	concat = Concatenate(axis=3)([avg_pool, max_pool])  # 拼接
	#assert concat._keras_shape[-1] == 2
	cbam_feature = Conv2D(filters = 1,
					kernel_size=kernel_size,
					strides=1,
					padding='same',
					activation='sigmoid',
					kernel_initializer='he_normal',
					use_bias=False)(concat)
	#assert cbam_feature._keras_shape[-1] == 1

	if K.image_data_format() == "channels_first":
		cbam_feature = Permute((3, 1, 2))(cbam_feature)

	return multiply([input_feature, cbam_feature])
空间注意力:将输入的featuremap,做一个基于channel的global max pooling 和global average pooling。
目的:保持特征图大小不变
CBAM
将Channel attention模块输出的特征图作为Spatial attention模块的输入特征图
def cbam_block(cbam_feature, ratio=8):

	cbam_feature = channel_attention(cbam_feature, ratio)
	cbam_feature = spatial_attention(cbam_feature)
	return cbam_feature
到底如何做到“随插随用”
首先用keras框架构建一个Resnet_v1
# resnet layer
def resnet_layer(inputs,
                 num_filters=16,
                 kernel_size=3,
                 strides=1,
                 activation='relu',
                 batch_normalization=True,
                 conv_first=True):#True is v1 False is v2

    conv = Conv2D(num_filters,
                  kernel_size=kernel_size,
                  strides=strides,
                  padding='same',
                  kernel_initializer='he_normal',
                  kernel_regularizer=l2(1e-4))

    x = inputs
    if conv_first:
        x = conv(x)
        if batch_normalization:
            x = BatchNormalization()(x)
        if activation is not None:
            x = Activation(activation)(x)
    else:
        if batch_normalization:
            x = BatchNormalization()(x)
        if activation is not None:
            x = Activation(activation)(x)
        x = conv(x)
    return x


#def resnet_v1(input_shape, depth, num_classes=10):  原始代码
def resnet_v1(input_shape, depth, num_classes=10, attention_module=None): #改进1
    if (depth - 2) % 6 != 0:
        raise ValueError('depth should be 6n+2 (eg 20, 32, 44 in [a])')
    # Start model definition.
    num_filters = 16
    num_res_blocks = int((depth - 2) / 6)#3

    inputs = Input(shape=input_shape)
    x = resnet_layer(inputs=inputs)
    # Instantiate the stack of residual units
    for stack in range(3):
        for res_block in range(num_res_blocks):
            strides = 1
            if stack > 0 and res_block == 0:  # first layer but not first stack
                strides = 2  # downsample
            y = resnet_layer(inputs=x,
                             num_filters=num_filters,
                             strides=strides)
            y = resnet_layer(inputs=y,
                             num_filters=num_filters,
                             activation=None)
            if stack > 0 and res_block == 0:  # first layer but not first stack
                # linear projection residual shortcut connection to match
                # changed dims
                x = resnet_layer(inputs=x,
                                 num_filters=num_filters,
                                 kernel_size=1,
                                 strides=strides,
                                 activation=None,
                                 batch_normalization=False)
            if attention_module is not None:  #改进2
                y = cbam_block(y)  #改进3
            x = keras.layers.add([x, y])
            x = Activation('relu')(x)


            #x = keras.layers.add([x, y])# 原始代码
            #x = Activation('relu')(x)

        num_filters *= 2

    # Add classifier on top.
    # v1 does not use BN after last shortcut connection-ReLU
    x = AveragePooling2D(pool_size=8)(x)
    y = Flatten()(x)#压平
    outputs = Dense(num_classes,
                    activation='softmax',
                    kernel_initializer='he_normal')(y)

    # Instantiate model.
    model = Model(inputs=inputs, outputs=outputs)
    return model
文章出处登录后可见!
已经登录?立即刷新