在这篇博文中,将介绍如何使用TF Lite model maker库创建TensorFlow Lite模型。我们将在自定义数据集上微调一个预训练的图像分类模型,并进一步探索Tensorflow Lite支持的不同类型的模型优化技术,并将其导出到TF Lite模型。将创建的TF Lite模型与通过Tensorflow Lite 转换的模型进行详细的性能比较,最后将模型部署到web应用中。
1. TensorFlow Lite Model Maker
TensorFlow Lite Model Maker库使我们能够在自定义数据集上训练一个预训练的或一个自定义的TensorFlow Lite模型。当为边缘设备的ML应用程序部署TensorFlow神经网络模型时,它简化了转换模型到特定输入数据的过程。目前,它支持ML任务,例如
- 图像分类
- 对象检测
- 文本分类
- BERT QA
- 音频分类
- 推荐系统
2.安装
有两种方法可以安装Model Maker 库。
- 使用pip
pip install tflite-model-maker
- 从GitHub克隆源代码:
git clone https://github.com/tensorflow/examples
cd examples/tensorflow_examples/lite/model_maker/pip_package
pip install -e .
3. 准备数据集
与上一个博客类似,我们将使用微软的猫和狗数据集。我们将使用wget命令下载数据集。我们将使用zipfile库保存下载的文件,并将其解压到dataset文件夹。
#Importing zipfile
import zipfile
#Downloading the Cats and Dogs Dataset from Microsoft Download
!wget --no-check-certificate \
    "https://download.microsoft.com/download/3/E/1/3E1C3F21-ECDB-4869-8368-6DEBA77B919F/kagglecatsanddogs_3367a.zip" \
    -O "/content/cats-and-dogs.zip"

#Saving zip file
local_zip = '/content/cats-and-dogs.zip'
zip_ref   = zipfile.ZipFile(local_zip, 'r')

#Extracting zip file
zip_ref.extractall('/content/')
zip_ref.close()
我们将使用image_classifier()模块中的DataLoader()函数来加载图像分类数据。由于数据存储在目录中,文件夹的名称是图像数据的标签,因此我们将使用DataLoader.from_folder()加载数据。但在此之前,我们必须将所有图像转换为.png格式,因为目前Dataloader()只支持png和jpeg格式的图像。我们将首先从数据集中删除两个损坏的图像文件。
#Removing corrupted images in the dataset
rm /content/PetImages/Cat/666.jpg
rm /content/PetImages/Dog/11702.jpg
#Importing libraries
from PIL import Image
import glob
import os
from pathlib import Path

#Converting images in cat folder to png format
current_dir = Path('/content/PetImages/Cat').resolve()
outputdir = Path('/content/Dataset').resolve()
out_dir = outputdir / "Cat"
os.mkdir(out_dir)
cnt = 0

for img in glob.glob(str(current_dir / "*.jpg")):
    filename = Path(img).stem
    Image.open(img).save(str(out_dir / f'{filename}.png'))
    cnt = cnt + 1
    print(cnt)

#Converting images in dog folder to png format
current_dir = Path('/content/PetImages/Dog/').resolve()
outputdir = Path('/content/Dataset/').resolve()
out_dir = outputdir / "Dog"
os.mkdir(out_dir)
cnt = 0

for img in glob.glob(str(current_dir / "*.jpg")):
    filename = Path(img).stem
    Image.open(img).convert('RGB').save(str(out_dir / f'{filename}.png'))
    cnt = cnt + 1
    print(cnt)
我们使用Dataloder.from_folder()函数加载数据集。
#Loading dataset using the Dataloader
data = DataLoader.from_folder('/content/Dataset')
INFO:tensorflow:Load image with size: 24998, num_label: 2, labels: Cat, Dog.
现在,我们将数据集按7:2:1的比例分别拆分为训练集、验证集和测试集。
#Splitting dataset into training, validation and testing data
train_data, rest_data = data.split(0.7)
validation_data, test_data = rest_data.split(0.67)
看一下数据集中的一些图像
#Visualizing images in the dataset
plt.figure(figsize=(10,10))
for i, (image, label) in enumerate(data.gen_dataset().unbatch().take(25)):
  plt.subplot(5,5,i+1)
  plt.xticks([])
  plt.yticks([])
  plt.grid(False)
  plt.imshow(image.numpy(), cmap=plt.cm.gray)
  plt.xlabel(data.index_to_label[label.numpy()])
plt.show()

4. 模型训练
我们将重新训练effecentnet Lite 0模型。它在Imagenet (ILSVRC-2012-CLS)上训练,针对TFLite进行优化,并针对移动CPU、GPU和EdgeTPU的性能进行设计。由于边缘设备的需求,对原有的EfficientNets做了以下改动:
- 移除了
squeeze-and-excite blocks(SE),因为SE在一些移动加速器中不能很好地支持。 - 用RELU6替换所有的swish,更容易后量化。
- 固定 stem 和head部分,同时压缩模型,以保持模型小和快速。
我们将使用image_classifier.create()函数创建模型。model_spec()帮助我们指定将使用model_spec.get()函数导入预先训练的图像分类模型。我们将分别传递train_data和validation_data作为训练数据集和验证数据集。此外,为了重新训练整个模型,我们已经将train_whole_model设置为true。根据需要在image_classifier.create()中添加其他参数。我们让其余的参数保持默认值。
#Training the model
model = image_classifier.create(train_data, model_spec=model_spec.get('efficientnet_lite0'), validation_data=validation_data, train_whole_model=True,)
INFO:tensorflow:Retraining the models...
INFO:tensorflow:Retraining the models...
Model: "sequential_1"
_________________________________________________________________
Layer (type)                Output Shape              Param #
=================================================================
hub_keras_layer_v1v2_1 (Hub  (None, 1280)             3413024
KerasLayerV1V2)

dropout_1 (Dropout)         (None, 1280)              0

dense_1 (Dense)             (None, 2)                 2562

=================================================================
Total params: 3,415,586
Trainable params: 2,562
Non-trainable params: 3,413,024
_________________________________________________________________
None
Epoch 1/5
/usr/local/lib/python3.7/dist-packages/keras/optimizer_v2/gradient_descent.py:102: UserWarning: The `lr` argument is deprecated, use `learning_rate` instead.
  super(SGD, self).__init__(name, **kwargs)
546/546 [==============================] - 2586s 5s/step - loss: 0.2463 - accuracy: 0.9812 - val_loss: 0.2281 - val_accuracy: 0.9899
Epoch 2/5
546/546 [==============================] - 151s 277ms/step - loss: 0.2299 - accuracy: 0.9898 - val_loss: 0.2266 - val_accuracy: 0.9900
Epoch 3/5
546/546 [==============================] - 151s 276ms/step - loss: 0.2271 - accuracy: 0.9908 - val_loss: 0.2258 - val_accuracy: 0.9906
Epoch 4/5
546/546 [==============================] - 153s 281ms/step - loss: 0.2264 - accuracy: 0.9916 - val_loss: 0.2243 - val_accuracy: 0.9902
Epoch 5/5
546/546 [==============================] - 153s 280ms/step - loss: 0.2258 - accuracy: 0.9909 - val_loss: 0.2259 - val_accuracy: 0.9904
现在让我们使用model.evaluate()函数在测试数据集上评估模型。
loss, accuracy = model.evaluate(test_data)
78/78 [==============================] - 341s 4s/step - loss: 0.2246 - accuracy: 0.9911
5. 模型优化
5.1 FP 16量化
可以使用model.export()函数将模型导出到Float-16 TF Lite模型。这里,我们将为Float 16定义量化配置。然后,我们将评估测试数据集上导出的量化模型。
#Defining Config
config = QuantizationConfig.for_float16()

#Exporting Model
model.export(export_dir='/content/Models/', tflite_filename='model_fp16.tflite', quantization_config=config)

#Evaluating Exported Model
model.evaluate_tflite('/content//Models/model_fp16.tflite', test_data)
{'accuracy': 0.9911111111111112}
5.2 Dynamic 量化
对于dynamic量化,我们将把量化配置设置为dynamic格式。其余过程与FP 16量化过程相同。
#Defining Config
config = QuantizationConfig.for_dynamic()
#Exporting Model
model.export(export_dir='/content/Models/', tflite_filename='model_dynamic.tflite', quantization_config=config)
#Evaluating Exported Model
model.evaluate_tflite('/content/Models/model_dynamic.tflite', test_data)
{'accuracy': 0.9919191919191919}
5.3 Integer 量化
与以前的量化类似,我们将整数量化的量化配置更改为整数格式。然后,我们将导出模型,并在测试数据集中对其进行评估。
#Defining Config
config = QuantizationConfig.for_int8(test_data)
#Exporting Model
model.export(export_dir='/content/Models/', tflite_filename='model_int8.tflite', quantization_config=config)
#Evaluating Exported Model
model.evaluate_tflite('/content/model_int8.tflite', test_data)
{'accuracy': 0.9915151515151515}
6. 创建和转换TF Lite模型的比较
在上一篇博客中,我们已经将微调过的模型转换为TF Lite。在这里,我们将比较转换后的TF Lite模型与本博客中创建的模型的性能。
6.1测试精度
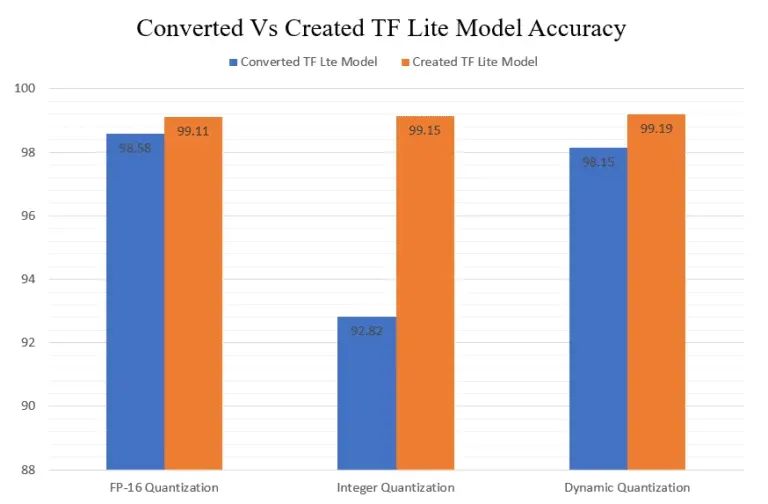
在创建的模型中可以看到,FP-16量化模型的准确性略有提高。但在整数量化模型的情况下,可以看到精度的显著性增加。
6.2模型的大小
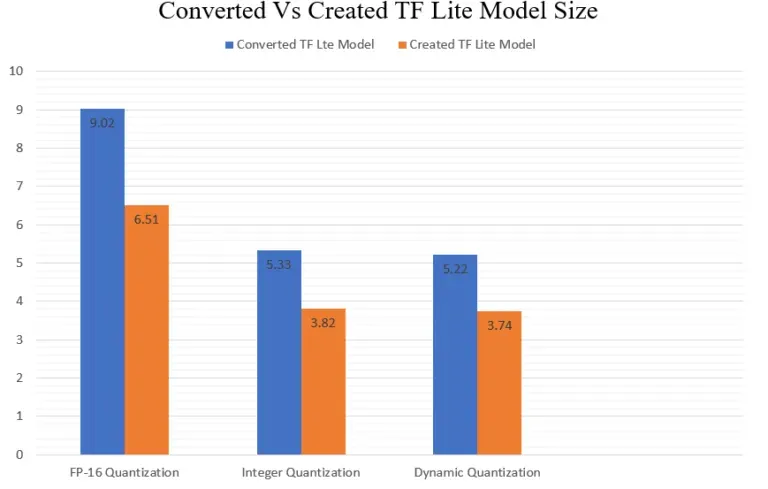
我们可以清楚地看到,创建的TF Lite模型比转换的更轻。FP-16量化模型的模型大小差异最为显著。
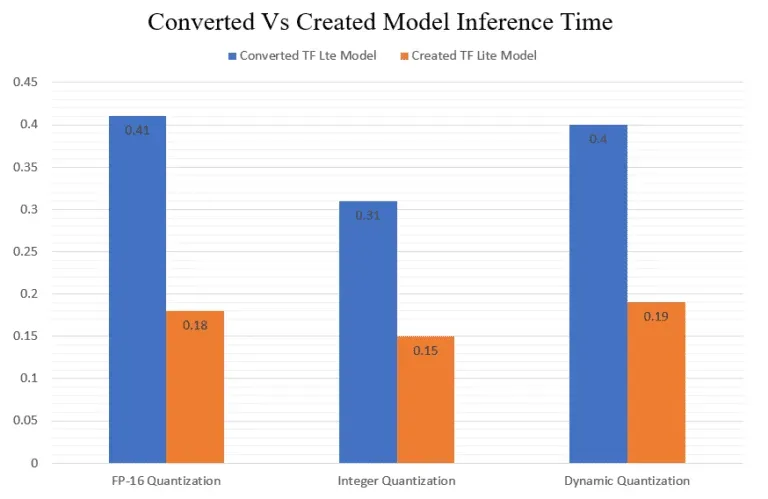
6.3推理时间
7. Streamlit部署
在之前的博客中,我们已经在边缘设备上部署了TF Lite模型。TF Lite 模型轻量化和快速的推理速度也使其适合部署在云上。现在让我们创建一个猫对狗图像分类器Web应用程序,我们将上传一张图像,我们的模型将推理这张图像是猫还是狗。Streamlit是一个开源应用程序框架,它允许我们用python开发和部署web应用程序。
我们将从导入所需的库和包开始。
# Importing Libraries and Packages
from PIL import Image
import streamlit as st
import tensorflow as tf
import time
import os
们定义将作为预期输出返回的类标签。
class_names = ["Cat", "Dog"]
定义一个函数来设置interpreter的输入张量。
def set_input_tensor(interpreter, image):
  """Sets the input tensor."""
  tensor_index = interpreter.get_input_details()[0]['index']
  input_tensor = interpreter.tensor(tensor_index)()[0]
  input_tensor[:, :] = image
现在,我们将定义函数get_forecasts(),它将接受一张图像作为输入并返回图像的预测类型。
def get_predictions(input_image):
    output_details = tflite_interpreter.get_output_details()
    set_input_tensor(tflite_interpreter, input_image)
    tflite_interpreter.invoke()
    tflite_model_prediction = tflite_interpreter.get_tensor(output_details[0]["index"])
    tflite_model_prediction = tflite_model_prediction.squeeze().argmax(axis = 0)
    pred_class = class_names[tflite_model_prediction]
    # print(tflite_model_prediction)
    # print(pred_class)
    return pred_class
现在,我们将定义web应用程序的一些元素,如标题、标题和侧边栏。
## Page Title
st.set_page_config(page_title = "Cats vs Dogs Image Classification")
st.title(" Cat vs Dogs Image Classification")
st.markdown("---")
现在我们将创建工具条,以便用户可以选择任何已创建和转换的TF Lite模型。
## Sidebar
st.sidebar.header("TF Lite Models")
display = ("Select a Model","Converted FP-16 Quantized Model", "Converted Integer Quantized Model", "Converted Dynamic Range Quantized Model","Created FP-16 Quantized Model", "Created Quantized Model", "Created Dynamic Range Quantized Model")
options = list(range(len(display)))
value = st.sidebar.selectbox("Model", options, format_func=lambda x: display[x])
print(value)
根据所选择的模型,我们必须相应地设置模型的路径。
if value == 1:
    tflite_interpreter = tf.lite.Interpreter(model_path='models\converted_fp_16_model.tflite')
if value == 2:
    tflite_interpreter = tf.lite.Interpreter(model_path='models\converted_int_quant_model.tflite')
if value == 3:
    tflite_interpreter = tf.lite.Interpreter(model_path='models\converted_dynamic_quant_model.tflite')
if value == 4:
    tflite_interpreter = tf.lite.Interpreter(model_path='models\created_model_fp16.tflite')

if value == 5:
    tflite_interpreter = tf.lite.Interpreter(model_path='models\created_model_int8.tflite')

if value == 6:
    tflite_interpreter = tf.lite.Interpreter(model_path='models\created_model_dynamic.tflite')
现在让我们定义一个函数,该函数允许上传图片文件并将其保存到临时目录,以便模型进行推理。在这里,如果选择的模型是整数量化的,我们将必须确保上传的图像转换为uint8格式。
## Input Fields
uploaded_file = st.file_uploader("Upload a Image", type=["jpg","png", 'jpeg'])
if uploaded_file is not None:
    with open(os.path.join("tempDir",uploaded_file.name),"wb") as f:
         f.write(uploaded_file.getbuffer())
    path = os.path.join("tempDir",uploaded_file.name)
    img = tf.keras.preprocessing.image.load_img(path , grayscale=False, color_mode='rgb', target_size=(224,224,3), interpolation='nearest')
    st.image(img)
    print(value)
    if value == 2 or value == 5:
        img = tf.image.convert_image_dtype(img, tf.uint8)
    img_array = tf.keras.preprocessing.image.img_to_array(img)
    img_array = tf.expand_dims(img_array, 0)
我们创建一个预测按钮
if st.button("Get Predictions"):
    suggestion = get_predictions(input_image =img_array)
    st.success(suggestion)
完整的app.py
# Imports
import streamlit as st
import tensorflow as tf
import os
import numpy as np
class_names = ["Cat", "Dog"]

## Page Title
st.set_page_config(page_title = "Cats vs Dogs Image Classification")
st.title(" Cat vs Dogs Image Classification")
st.markdown("---")

## Sidebar
st.sidebar.header("TF Lite Models")
display = ("Select a Model","Converted FP-16 Quantized Model", "Converted Integer Quantized Model", "Converted Dynamic Range Quantized Model","Created FP-16 Quantized Model", "Created Quantized Model", "Created Dynamic Range Quantized Model")
options = list(range(len(display)))
value = st.sidebar.selectbox("Model", options, format_func=lambda x: display[x])
print(value)

if value == 1:
    tflite_interpreter = tf.lite.Interpreter(model_path='models\converted_fp_16_model.tflite')
    tflite_interpreter.allocate_tensors()
if value == 2:
    tflite_interpreter = tf.lite.Interpreter(model_path='models\converted_int_quant_model.tflite')
    tflite_interpreter.allocate_tensors()
if value == 3:
    tflite_interpreter = tf.lite.Interpreter(model_path='models\converted_dynamic_quant_model.tflite')
    tflite_interpreter.allocate_tensors()
if value == 4:
    tflite_interpreter = tf.lite.Interpreter(model_path='models\created_model_fp16.tflite')
    tflite_interpreter.allocate_tensors()
if value == 5:
    tflite_interpreter = tf.lite.Interpreter(model_path='models\created_model_int8.tflite')
    tflite_interpreter.allocate_tensors()
if value == 6:
    tflite_interpreter = tf.lite.Interpreter(model_path='models\created_model_dynamic.tflite')
    tflite_interpreter.allocate_tensors()

def set_input_tensor(interpreter, image):
  """Sets the input tensor."""
  tensor_index = interpreter.get_input_details()[0]['index']
  input_tensor = interpreter.tensor(tensor_index)()[0]
  input_tensor[:, :] = image

def get_predictions(input_image):
    output_details = tflite_interpreter.get_output_details()
    set_input_tensor(tflite_interpreter, input_image)
    tflite_interpreter.invoke()
    tflite_model_prediction = tflite_interpreter.get_tensor(output_details[0]["index"])
    tflite_model_prediction = tflite_model_prediction.squeeze().argmax(axis = 0)
    pred_class = class_names[tflite_model_prediction]
    return pred_class


## Input Fields
uploaded_file = st.file_uploader("Upload a Image", type=["jpg","png", 'jpeg'])
if uploaded_file is not None:
    with open(os.path.join("tempDir",uploaded_file.name),"wb") as f:
        f.write(uploaded_file.getbuffer())
    path = os.path.join("tempDir",uploaded_file.name)
    img = tf.keras.preprocessing.image.load_img(path , grayscale=False, color_mode='rgb', target_size=(224,224,3), interpolation='nearest')
    st.image(img)
    print(value)
    if value == 2 or value == 5:
        img = tf.image.convert_image_dtype(img, tf.uint8)
    img_array = tf.keras.preprocessing.image.img_to_array(img)
    img_array = tf.expand_dims(img_array, 0)


if st.button("Get Predictions"):
    suggestion = get_predictions(input_image =img_array)
    st.success(suggestion)
需要安装一些包,使得应用运行起来, 安装包的requirements.txt文件如下:
streamlit
tensorflow-cpu
opencv-python
我们将把这个图片和TF Lite模型上传到github仓库
现在我们准备在 streamlit share上部署我们的应用程序。我们只需在github库中指定app.py的url。
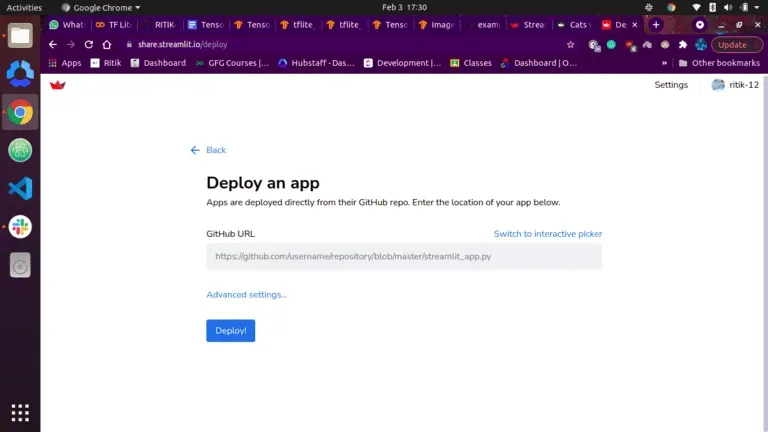
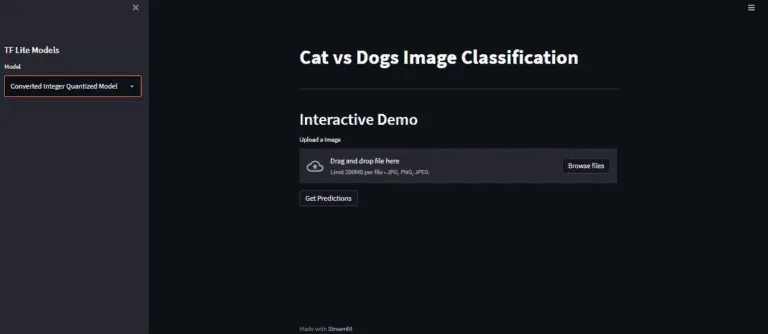
我们只需点击部署!应用程序就可以完成部署!

选择一个模型,比如说转换的整数量化模型。
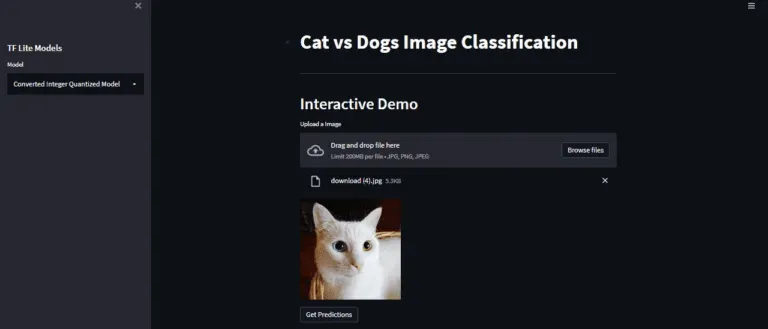
上传一张图片:
通过点击get forecasts按钮来获取模型预测
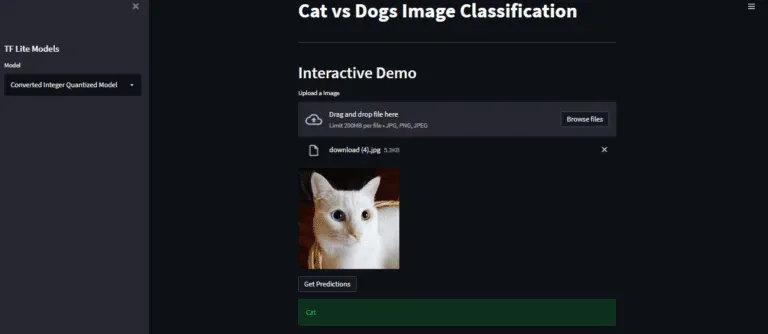
正如我们在这里看到的,我们已经成功地部署了应用程序,并能够从模型中进行推理。
源码下载
文章出处登录后可见!