目录
一、基础语法
1.Print()函数
1.将数据输出到文件中
fp=open('D:/text.txt','a+')
print('helloworld',file=fp)
fp.close()
(1)所指定的盘符存在
(2)使用file = fp
2.不进行换行输出(输出内容在一行当中)
print('hello','world','Python')3.转义字符
print('hello\nworld')
print('hello\tworld')#制表符
print('helloooo\tworld')
print('hello\rworld')#\r后面覆盖前面
print('hello\bworld')#\b退格

print('http:\\www.baidu.com')
print('老师说\'大家好\'')

#原字符,不希望字符串中的转义字符起作用,就使用原字符,就是在字符串之前加上r或R
print(r'hello\nworld')
#最后一个字符不能是反斜杠
4.输出二进制字符
print(chr(0b100111001011000))#输出乘5.输出十进制的字符
print(ord('乘'))#输出十进制的乘6.显示python中的所有文件
print(dir(__builtins__))
2.变量的定义和使用
1.变量的标识
name='月亮'
print(id(name))#输出结果为2369314240720
2.变量的类型
name='月亮'
print(type(name))#输出结果为<class 'str'>
3.变量的名称
name='月亮'
print(name)#输出结果为月亮
4.多次赋值之后,变量名会指向新的空间
name='大月亮'
print(name)#输出结果为大月亮
name='小月亮'
print(name)#输出结果为小月亮
5.删除变量
x=1
del x
3.整数类型
整数可以表示为二进制,十进制,八进制,十六进制
print('十进制',118)#十进制输出结果为118
print('二进制',0b10101111)#二进制以0b开头,输出结果为175
print('八进制',0o176)#八进制以0o开头,输出结果为126
print('十六进制',0x1EAF)#十六进制以0x开头,输出结果为7855
4.浮点类型
浮点数存储存在不精确性,使用浮点数进行计算时可能会出现小数位数不确定的情况
n1=1.1
n2=2.2
print(n1+n2)#输出结果为3.3000000000000003
#正确输出结果应为3.3
为解决这种情况导入模块decimal
from decimal import Decimal
print(Decimal('1.1')+Decimal('2.2'))#输出结果为3.3
5.布尔类型
布尔类型可用于计算
f1=True
f2=False
print(f1,type(f1))
print(f2,type(f2))

#布尔类型可以直接用于计算
print(1+f1)#True表示1
print(1+f2)#False表示0
6.字符串类型

关于定义时引号对于字符串的影响,三引号可用于多行定义
7.数据类型转换
类型不同的字符串合并方法
name='张三'
age=20

print(type(name),type(age))#说明name和age类型不同
print('我叫'+name+',今年'+str(age)+'岁')#当将str类型与int类型进行连接时,报错,解决方案
float、bool、int都可直接转化为string类型。
int()将其他类型转化为int类型
s1='128'
f1=98.7
s2='76.77'
ff=True
s3='hello'
print(type(s1),type(f1),type(s2),type(ff),type(s3))
print(int(s1),type(int(s1)))#将str转成int类型,字符串为数字串
print(int(f1),type(int(f1)))#将float转成int类型,截取整数部分,舍掉小数部分
#print(int(s2),type(int(s2)))#将str转成int类型,报错,因为字符串为小数串
print(int(ff),type(int(ff)))#输出结果为1
#print(int(s3),type(int(ff)))#将str转成int类型时,字符串必须为数字串(整数),非数字串不允许转换
float()将其他类型转成float类型
s1='128.98'
s2='76'
ff=True
s3='hello'
i=98
print(type(s1),type(s2),type(ff),type(s3),type(i))
print(float(s1),type(float(s1)))
print(float(s2),type(float(s2)))
#print(float(ff),type(float(ff)))#字符串中的数据如果是非数字串,则不允许转换
print(float(i),type(float(i)))
8.注释
中文编码声明注释在文件开头加上注释,用以指定源码文件的编码格式。
#coding:gbk
#coding:utf-8
单行注释和多行注释
#单行注释
print('hello')
#多行注释
'''我是
多行
注释'''
9.input()函数
input()函数的基本使用
如果引号里放中文字符报错就可以在模板第一行添加utf-8编码
# -*-coding:utf-8-*-
present=input('大圣想要什么礼物呢?')#输入定海神针
print(present,type(present))#输出结果为定海神针 <class 'str'>
类型转换
a=int(input('请输入一个加数:'))
b=int(input('请输入另一个加数:'))
print(a+b)
10.算术运算符
print(11/2)#除法运算,结果为5.5
print(11//2)#整除运算,结果为5
print(11%2)#取余运算,结果为1
print(2**2)#幂运算,表示2的2次方,结果为4
11.赋值运算符
链式赋值id相同
#链式赋值
a=b=c=20
print(a,id(a))
print(b,id(b))
print(c,id(c))
'''
输出结果
20 140734397925632
20 140734397925632
20 140734397925632'''
解包赋值
#解包赋值
a,b,c=20,30,40
print(a,b,c)#左右数量不同会报错
#交换两个变量
print('交换之前:',a,b)
a,b=b,a
print('交换之后:',a,b)
'''
输出结果
交换之前: 20 30
交换之后: 30 20
'''
12.比较运算符
比较value(值)是否相等用==,比较标识是否相等用is和is not
a=10
b=10
print(a==b)#True
print(a is b)#True
print(a is not b)#False
lst1=[11,22,33,44]
lst2=[11,22,33,44]
print(lst1==lst2)#True
print(lst1 is lst2)#False
print(lst1 is not lst2)#True13.布尔运算符
a,b=1,2
print(a==1 and b==2)#True
print(a==1 or b==2)#True
f=True
print(not f)#False
s='helloworld'
print('w' in s)#判断w在不在helloworld中,输出True
print('k' in s)#False
print('w' not in s)#False
print('k' not in s)#True
14.逻辑运算符
print(4&8)#按位与&,同为1时结果为1,结果为0
print(4|8)#按位或|,同为0才为0,结果为12
print(4<<1)#左移1位,高位溢出截断,低位补0相当于乘于2,结果为8
print(4<<2)#左移2位,结果为16
print(4>>1)#向右移动1位,相当于除2,结果为2
15.运算符的优先级
算术运算>位运算>比较运算>布尔运算>赋值运算
16.对象的布尔值
print(bool(False))#False
print(bool(0))#False
print(bool(0.0))#False
print(print(''))#False
print(bool(""))#False
print(bool([]))#False空列表
print(bool(list()))#False空列表
print(bool(()))#False空元组
print(bool(tuple()))#False空元组
print(bool({}))#空字典
print(bool(dict()))#空字典
print(bool(set()))#空集合
以上对象布尔值为False其他均为True
二、结构
1.分支结构
money=1000
s=int(input('请输入取款金额:'))#取款金额
if money>=s:
    money=money-s
    print('取款成功,余额为:',money)
多分支结构
score=int(input('请输入一个成绩:'))
if score>=90 and score<=100:
    print('A级')
elif score>=80 and score<=89:
    print('B级')
elif score>=70 and score<=79:
    print('C级')
elif score>=60 and score<=69:
    print('D级')
elif score>=0 and score<=59:
    print('E级')
else:
    print("对不起,您的输入有误")
python独特的写法
score=int(input('请输入一个成绩:'))
if 90<=score<=100:
    print('A级')
elif 80<=score<=89:
    print('B级')
elif 70<=score<=79:
    print('C级')
elif 60<=score<=69:
    print('D级')
elif 0<=score<=59:
    print('E级')
else:
    print("对不起,您的输入有误")
if-else的简写
num_a=int(input())
num_b=int(input())
print(str(num_a)+'大于等于'+str(num_b) if num_a>=num_b else str
pass可用于占坑
2.range函数创建列表
#range的三种创建方式
r=range(10)#默认从0开始,默认相差1
print(r)#range(0,10)
print(list(r))#可用该方法查看range对象中的整数序列

r=range(1,10)#指定了起始值,从1开始不包含10
print(list(r))

r=range(1,10,2)#指定了起始值结束值和单位差
print(list(r))
不管range对象表示的整数序列有多长,所有range对象占用的内存空间都是相同的,因为仅仅需要存储start,stop和step,只有当用到range对象时,才会去计算序列中的相关元素。
in和not in 判断整数序列中是否存在指定的整数。
a=0
sum=0
while a<=100:
    if not bool(a%2):
        sum+=a
    a+=1
print('1-100的偶数和',sum)
3.for-in循环
for item in 'Python':
    print(item)

for i in range(10):
    print(i)

for _ in range(5):
    print('人生苦短')
4.找水仙花数
for item in range(100,1000):
    ge=item%10
    shi=item//10%10
    bai=item//100
    #print(bai,shi,ge)
    #判断
    if ge**3+shi**3+bai**3==item:
        print(item)
5.else语句
else可与if搭配,也能与for、while语句搭配,与for语句和while语句搭配时,若程序没有执行break语句,则执行else语句
# -*-coding:utf-8-*-
for item in range(3):
    pewd=input('请输入密码:')
    if pewd=='8888':
        print('密码正确')
        break
    else:
        print('密码不正确')
else:
    print('对不起,三次密码均输入错误')
# -*-coding:utf-8-*-
a=0
while a<3:
pewd=input('请输入密码:')
if pewd=='8888':
print('密码正确')
break
else:
print('密码不正确')
a+=1
else:
print('对不起,三次密码均输入错误')6.嵌套循环
不换行输出小技巧
# -*-coding:utf-8-*-
for i in range(1,4):
    for j in range(1,5):
        print('*',end='\t') #不换行输出
    print()#换行
7.打印九九乘法表
# -*-coding:utf-8-*-
for i in range(1,10):
    for j in range(1,i+1):
        print(i,'*',j,'=',i*j,end='\t') #不换行输出
    print()#换行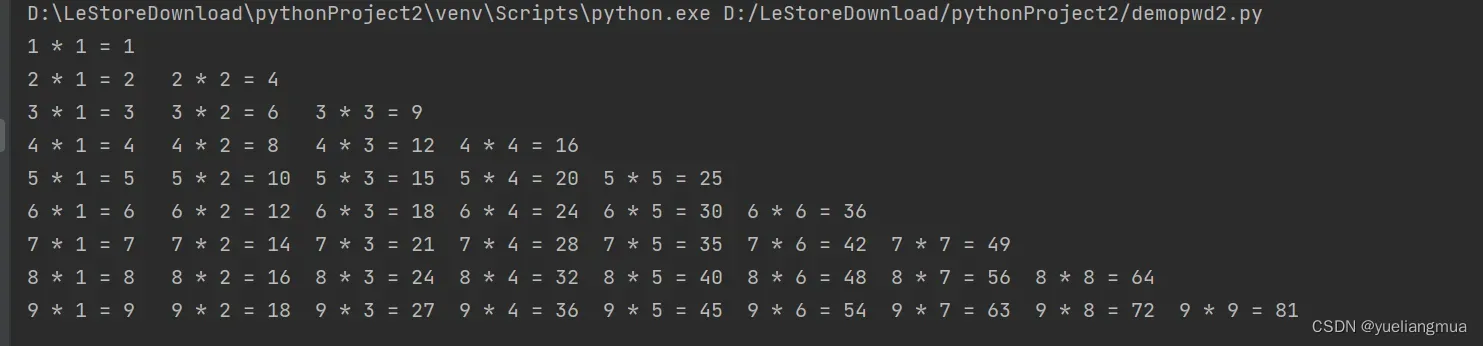
三、列表
1.创建列表的两种方式
# -*-coding:utf-8-*-
#创建列表的第一种方式,使用[]
lst=['hello','world',98]
#创建列表的第二种方式,使用内置函数list()
lst2=list(['hello','worl
2.列表的特点
1.列表元素按顺序有序排序
2.索引映射唯一一个数据(正序索引从0开始递增,逆序索引从-1开始递减)
3.列表可用存储重复数据
4.任意数据类型混存
5.根据需要动态分配和回收内存
3.列表的查询操作
根据元素查索引
# -*-coding:utf-8-*-
lst=['hello','world',98,'hello']
print(lst.index('hello'))#查找元素索引
print(lst.index('hello',0,3))#设置start和stop
根据索引查元素
# -*-coding:utf-8-*-
lst=['hello','world',98,'hello']
print(lst[2])#98
print(lst[-3])#'world'
4.列表的切片操作
# -*-coding:utf-8-*-
lst=[10,20,30,40,50,60,70,80]
print('切的片段:',lst[1:6:1])
#start=1,stop=6,step=1
print(lst[1:6:])
print(lst[1:6:2])
#step也可为负数
print(lst[-1:-6:-1])
5.列表元素的判断以及遍历
# -*-coding:utf-8-*-
lst=[10,20,'python','hello']
print(10 in lst)#True
print(100 not in lst)#True

for item in lst:
    print(item)
6.列表的添加操作
# -*-coding:utf-8-*-
#列表元素的增加操作
lst=[10,20,30]
print('添加元素之前',lst,id(lst))
lst.append(100)#在列表末尾添加一个元素
print('添加元素之后',lst,id(lst))
lst2=['hello','world']
lst.append(lst2)#将list2作为一个元素添加到lst的末尾
print(lst)
lst.extend(lst2)#在lst尾部一次性添加多个元素
print(lst)

#在任意位置上添加一个元素
lst.insert(1,90)
print(lst)

lst3=[True,False,'hello']
#在任意个位置上添加N个元素,切片操作
lst[1:]=lst3
print(lst)
输出结果:
添加元素之前 [10, 20, 30] 1603301146880
添加元素之后 [10, 20, 30, 100] 1603301146880
[10, 20, 30, 100, [‘hello’, ‘world’]]
[10, 20, 30, 100, [‘hello’, ‘world’], ‘hello’, ‘world’]
[10, 90, 20, 30, 100, [‘hello’, ‘world’], ‘hello’, ‘world’]
[10, True, False, ‘hello’]
7.列表的删除操作
# -*-coding:utf-8-*-
#列表元素的删除操作
lst=[10,20,30,40,50,60,30]
lst.remove(30)#从列表中移除一个元素,如果有重复元素,只移除第一个元素
print(lst)

#pop()根据索引移除元素
lst.pop(1)#如果不指定参数,那么将删除列表中的最后一个元素
print(lst)
#切片操作,删除至少一个元素,将产生一个新的列表对象
new_lst=lst[1:3]
print('原列表',lst)
print('切片后的列表',new_lst)

#不产生新的列表对象,而是删除原列表中的内容
lst[1:3]=[]
print(lst)

#清楚列表中的所有元素
lst.clear()
print(lst)

#del将列表对象删除
del lst
输出结果
[10, 20, 40, 50, 60, 30]
[10, 40, 50, 60, 30]
原列表 [10, 40, 50, 60, 30]
切片后的列表 [40, 50]
[10, 60, 30]
[]
8.列表的修改操作
# -*-coding:utf-8-*-
#列表元素的修改操作
lst=[10,20,30,40,50,60,30]
lst[2]=100

lst[1:3]=[300,400,500,600]
9.列表的排序操作
# -*-coding:utf-8-*-
#列表元素的排序操作
lst=[70,20,30,40,50,60,30]
print('排序前的列表',lst,id(lst))
lst.sort()#默认为升序
print('排序后的列表',lst,id(lst))
#指定关键词参数,将列表中元素进行降序排序
lst.sort(reverse=True)
print(lst)

#使用内置函数sorted()对列表进行排序,将产生一个新的列表对象
lst=[20,40,10,98,54]
new_list=sorted(lst)
#指定关键字参数,实现列表降序排序
desc_list=sorted(lst,reverse=True)
10.列表生成式
# -*-coding:utf-8-*-
lst=[i*i for i in range(1,10)]#i*i表示列表存储的内容
print(lst)#[1, 4, 9, 16, 25, 36, 49, 64, 81]
四、字典
1.字典的创建
# -*-coding:utf-8-*-
#使用{}创建字典
scores={'张三':100,'李四':98,'王五':45}
print(scores)
print(type(scores))

#使用dict()创建字典
student=dict(name='jack',age=20)
print(student)

#空字典
d={}
输出结果
{‘张三’: 100, ‘李四’: 98, ‘王五’: 45}
<class ‘dict’>
{‘name’: ‘jack’, ‘age’: 20}
2.字典的增 删 改操作
scores={'张三':100,'李四':98,'王五':45}
print('张三' in scores)#True
print('张三' not in scores)#False

del scores['张三'] #删除指定的键值对
scores.clear()#清空字典的元素

scores['陈六']=98#新增元素

scores['陈六']=100#修改value
3.获取字典视图
scores={'张三':100,'李四':98,'王五':45}

#获取所有的key
keys=scores.keys()
print(keys)
print(type(keys))#dict类型
print(list(keys))

#获取所有的value
values=scores.values()
print(values)
print(type(values))#dict类型
print(list(values))

#获取所有键值对
items=scores.items()
print(items)#元组列表
4.字典元素的遍历
方括号形式若键不存在会抛出异常,而get方法不会
scores={'张三':100,'李四':98,'王五':45}
#字典元素的遍历
for item in scores:
   print(item, scores[item],scores.get(item))#方括号形式若键不存在会抛出异常,而get方法不会
5.字典的特点
d={'name':'张三','name':'李四'} #key 不允许重复
print(d)#name:李四

d={'name':'张三','nikename':'张三'}
print(d)#

#字典的元素是无序的
6.字典生成式
items=['Fruits','Books','Others']
prices=[96,78,85]

d={item.upper():price for item ,price in zip(items, prices) }#加了.upper()key全变大写.lower变小写
print(d)#zip以短的元素来生成
不可变序列:字符串/元组(没有增删改操作)
可变序列:列表/字典(可以对序列执行增删改操作,对象地址不发生更改)
五、元组
1.元组的创建方式
#直接小括号
t=('Python','hello',90)
#使用内置函数tuple()
t=tuple(('Python','hello',90))
#只包含一个元组的元素需要使用逗号和小括号
t=(10,)
为什么要将元组设计成不可变序列:
在多任务环境下,同时操作对象时不需要加锁
元组中储存对象的引用:
如果元组中对象本身是不可变对象,则不能再引用其他对象
如果元组中的对象时可变对象,则可变对象的引用不允许改变,但数据可以改变
t=(10,[20,30],40)
#t[1]=100元组不允许修改元素
t[1].append(100)
2.遍历元组
t=tuple(('Python','hello',90))
for item in t:
   print(item)
六、集合
1.集合的创建
# -*-coding:utf-8-*-
#使用{}创建集合
s={2, 3, 4, 5, 5, 6, 7, 7}#集合中元素不允许重复
print(s)

#第二种创建方式使用set()

s1 = set(range(5))
print(s1, type(s1))

s2 = set([1,2,3,4,5,5,5,6,6])#列表转集合
print(s2, type(s2))

s3 = set((1,2,4,4,5,65))#元组转集合
print(s3, type(s3))

s4 = set('python')#字符串转集合
print(s4,type(s4))

s5 = set({124, 3, 4, 55, 6, 6})#集合转集合
print(s5, type(s5))

s6 = {}
print(s6, type(s6))

s7 = set()#生成空字典
print(s7, type(s7))

s8 = {''}
print(s8, type(s8))
输出结果
{2, 3, 4, 5, 6, 7}
{0, 1, 2, 3, 4} <class ‘set’>
{1, 2, 3, 4, 5, 6} <class ‘set’>
{65, 1, 2, 4, 5} <class ‘set’>
{‘o’, ‘t’, ‘p’, ‘y’, ‘h’, ‘n’} <class ‘set’>
{3, 4, 6, 55, 124} <class ‘set’>
{} <class ‘dict’>
set() <class ‘set’>
{”} <class ‘set’>
2.集合的相关操作
# -*-coding:utf-8-*-
#集合元素的判断操作
s = {10, 20, 30}
print(10 in s)#True

#集合元素的新增操作
#一次添加一个
s.add(80)
print(s)
#一次至少添加一个
s.update({200, 400, 300})
print(s)
s.update([100, 99, 8])
s.update((78, 64, 56))

#集合元素的删除操作
s.remove(100)
print(s)
#s.remove(500)#KeyError: 500
#discard()删除指定元素,不抛出异常
s.discard(500)
print(s)
#pop()任意删除一个
s.pop()
print(s)
s.clear()
输出结果
True
{80, 10, 20, 30}
{80, 400, 20, 200, 10, 300, 30}
{64, 200, 8, 10, 78, 80, 400, 20, 30, 99, 300, 56}
{64, 200, 8, 10, 78, 80, 400, 20, 30, 99, 300, 56}
{200, 8, 10, 78, 80, 400, 20, 30, 99, 300, 56}
3.集合间的关系
# -*-coding:utf-8-*-
#一个集合是否是另一个集合的子集
s1 = {10, 20, 30, 40, 50, 60}
s2 = {10, 20, 30, 40}
s3 = {10, 20, 90}
print(s2.issubset(s1))#True
print(s3.issubset(s1))#False

#一个集合是否是另一个集合的超集
print(s1.issuperset(s2))#True
print(s1.issuperset(s3))#False

#两个集合是否含有交集
print(s2.isdisjoint(s3))#False 有交集为False
s4 = {400, 200, 300}#True
4.集合的数据操作
#交集操作
s1 = {10,20,30,40}
s2 = {20,30,40,50,60}
print(s1.intersection(s2))
print(s1 & s2)#intersection 与 &等价

#并集操作
print(s1.union(s2))
print(s1|s2)#union与|等价

#差集操作
print(s1.difference(s2))
print(s1-s2)

#对称差集
print(s1.symmetric_difference(s2))
print(s1^s2)
输出结果
{40, 20, 30}
{40, 20, 30}
{40, 10, 50, 20, 60, 30}
{40, 10, 50, 20, 60, 30}
{10}
{10}
{50, 10, 60}
{50, 10, 60}
5.集合生成式
#列表生成式
lst=[i*i for i in range(6)]
print(lst)

#集合生成式
s={ i*i for i in range(10) }
print(s)
输出结果
[0, 1, 4, 9, 16, 25]
{0, 1, 64, 4, 36, 9, 16, 49, 81, 25}
列表、字典、元组、集合总结
| 数据结构 | 是否可变 | 是否重复 | 是否有序 | 定义符号 |
|---|---|---|---|---|
| 列表(list) | 可变 | 可重复 | 有序 | [] |
| 元组(tuple) | 不可变 | 可重复 | 有序 | () |
| 字典(dict) | 可变 | key不可重复 value可重复 | 无序 | {key:value} |
| 集合(set) | 可变 | 不可重复 | 无序 | {} |
七、字符串的驻留机制
仅保存一份相同且不可变的字符串的方法,不同的值被存放在字符串的驻留池中,Python的驻留机制对相同的字符串只保留一份拷贝,后续创建相同字符串时,不会开辟新空间,而是把该字符串的地址赋给新创建的变量。
驻留机制的几种情况(交互模式) :
1.字符串的长度为0或1时
2.符合标识符的字符串
3.字符串只在编译时进行驻留,而非运行时
4.[-5,256]之间的整数数字
sys中的intern方法强制两个字符串指向同一个对象
PyCharm对字符串进行了优化处理,所以没驻留的id也显示相同
>>> s1=''
>>> s2=''
>>> s1 is s2
True
>>> s1='abc%'
>>> s2='abc%'
>>> s1 == s2
True
>>> s1 is s2
False
>>> s1='abcx'
>>> s2='abcx'
>>> s1 is s2
True
>>> a='abc'
>>> b='ab'+'c'
>>> c=''.join(['ab','c'])
>>> a is b
True
>>> a is c
False
>>> type(c)
<class 'str'>
>>> type(a)
<class 'str'>
>>> a=-5
>>> b=-5
>>> a is b
True
>>> a=-6
>>> b=-6
>>> a is b
False
>>> import sys
>>> a='abc%'
>>> b='abc%'
>>> a is b
False
>>> a=sys.intern(b)
>>> a is b
True
>>>
字符串驻留机制的优缺点:
当需要值相同的字符串时,可以直接从字符串池里拿来使用,避免频繁的创建和销毁,提升效率和节约内存,因此拼接字符串和修改字符串是会比较影响性能的。
在需要进行字符串拼接是建议使用str类型的join方法,而非+,因为join()方法是先计算出所有字符中的长度,然后再拷贝,只new一次对象,效率要比“+”高。
a = 'Python'
b = "Python"
c = '''Python'''
print(a,id(a))
print(b,id(b))
print(c,id(c))
输出结果
Python 2495641118512
Python 2495641118512
Python 2495641118512
字符串的常用操作
字符串的查询操作:
#字符串的查询操作
s='hello,hello'
#index()查询字串第一次出现的位置,若不存在则抛出ValueError
print(s.index('lo'))#3
#index()查询字串最后一次出现的位置,若不存在则抛出ValueError
print(s.find('lo'))#3
#index()查询字串第一次出现的位置,若不存在则返回-1
print(s.rindex('lo'))#9
#index()查询字串最后一次出现的位置,若不存在则返回-1
print(s.rfind('lo'))#9
字符串的大小写转换操作:
#字符串的大小写转换操作
s='hello,python'
#把字符串中所有字符都转成大写字母
a=s.upper()#转成大写之后,会产生一个新的字符串对象
print(a,id(a))
print(s,id(s))
#把字符串中所有字符都转成小写字母
b=s.lower()#转换之后,产生新的字符串对象
print(b,id(b))
print(s,id(s))
#把字符串中所有大写字符都转成小写字母,小写转成大写
s2='hello,Python'
print(s2.swapcase())
#把字符串中第一个字符转成大写字母,其余转成小写
print(s2.capitalize())
#把字符串中每个单词的第一个字符都转成大写字母,剩余字符转为小写
print(s2.title())
输出结果:
HELLO,PYTHON 1416246594288
hello,python 1416246594544
hello,python 1416246591600
hello,python 1416246594544
HELLO,pYTHON
Hello,python
Hello,Python
字符串内容对齐操作:
s='hello,Python'
print(s.center(20,'*'))#居中对齐,若第二个参数不指定填充符,默认为空格,指定小于原字符串则返回原字符串
print(s.ljust(20,'*'))#左对齐
print(s.rjust(20,'*'))#右对齐
print(s.zfill(20))#右对齐,左侧用0对齐
print('-8910'.zfill(8))
输出结果:
****hello,Python****
hello,Python********
********hello,Python
00000000hello,Python
-0008910
字符串劈分操作:
#split()
s='hello world Python'
lst=s.split()#默认分割符为空格
print(lst)

s1='hello|world|Python'
print(s1.split(sep='|'))
print(s1.split(sep='|',maxsplit=1))#设置最大劈分次数,剩余的会单独作为一部分

#rsplit()
print(s.rsplit())
print(s1.rsplit(sep='|'))
print(s1.rsplit(sep='|',maxsplit=1))
输出结果:
[‘hello’, ‘world’, ‘Python’]
[‘hello’, ‘world’, ‘Python’]
[‘hello’, ‘world|Python’]
[‘hello’, ‘world’, ‘Python’]
[‘hello’, ‘world’, ‘Python’]
[‘hello|world’, ‘Python’]
字符串判断的相关方法:
s='hello,python'
print(s.isidentifier())#判断是否是合法的标识符字符串

print('\t'.isspace())#判断是否是全部由空白字符组成(回车、换行、水平制表符)

print('abc张三'.isalpha())#判断是否全部由字符组成

print('123'.isdecimal())#判断是否全部是十进制数字

print('123四Ⅳ'.isnumeric())#判断是否全由数字组成

print('abc1'.isalnum())#是否全部由字母和数字组成
输出结果:
False
True
True
True
True
True
字符串操作的其他方法:
#repalce()
s='hello,Python'
print(s.replace('Python','Java'))
s1='hello,Python,Python,Python'
print(s1.replace('Python','Java',2))

#join()将列表或元组中的字符串合并成一个字符串
lst=['hello','Java','Python']
print('|'.join(lst))

t=('hello','Java','Python')
print(''.join(t))

print('*'.join('Python'))
输出结果:
hello,Java
hello,Java,Java,Python
hello|Java|Python
helloJavaPython
P*y*t*h*o*n
print(ord(‘a’))可获得a字符的原始值97
print(chr(97))根据原始值获得字符a
字符串的切片操作:
s='hello,Python'
s1=s[:5]
s2=s[6:]
s3='!'
newstr=s1+s3+s2

print(s1,s2,s3,newstr)
输出结果:
hello Python ! hello!Python
格式化字符串:
#第一种占位符
name='张三'
age=20
print('我叫%s,今年%d岁' % (name,age))

#第二种占位符
print('我叫{0},今年{1}岁'.format(name,age))#只有一个可用花括号内不写索引

#第三种占位符
print(f'我叫{name},今年{age}岁')

#精度
print('{0:.3}'.format(3.1415926))#输出3.14表示一共输出3位数
print('{0:.3f}'.format(3.1415926))#输出3.142输出三位小数
字符串的编码转换:
s='海上生明月'
#编码
print(s.encode(encoding='GBK')) #在GBK这种编码格式中,一个中文占两个字节
print(s.encode(encoding='UTF-8'))#一个中文占三个字节

#解码
byte=s.encode(encoding='GBK')
print(byte.decode(encoding='GBK'))
#编码格式和解码格式要相同
输出结果:
b’\xba\xa3\xc9\xcf\xc9\xfa\xc3\xf7\xd4\xc2′
b’\xe6\xb5\xb7\xe4\xb8\x8a\xe7\x94\x9f\xe6\x98\x8e\xe6\x9c\x88′
海上生明月
函数的创建和调用
def calc(a,b):#形参
    c=a+b
    return c

result=calc(10,20)#实参
print(result)

res=calc(b=10,a=20)#关键词参数
print(result)
函数返回值如果是多个,则返回元组
可变的位置参数和关键字参数
参数只能定义一个,但是在一个函数的定义过程中,既有个数可变的关键字形参,也有个数可变的位置形参,要求个数可变的位置形参,放在个数可变的关键字形参之前
#个数可变的位置参数
def fun(*args):
    print(args)#返回元组

fun(10)
fun(10,20)
fun(20,34,55)

#个数可变的关键字形参
def fun1(**args):
    print(args)#返回字典

fun1(a=10)
fun1(a=20,b=90,c=89)
输出结果:
(10,)
(10, 20)
(20, 34, 55)
{‘a’: 10}
{‘a’: 20, ‘b’: 90, ‘c’: 89}
函数总结:
def fun(a,b,c):
    print(a)
    print(b)
    print(c)
lst=[11,22,33]
fun(*lst)#在函数调用时,将列表中的每个元素都转换为位置实参传入
dic={'a':111,'b':222,'c':333}
fun(**dic)#在函数调用时,将字典中的键值对都转换为关键字实参传入

def fun1(a,b,*,c,d):#c和d的实参只能用关键字实参传递
    print(a)
    print(b)
    print(c)
    print(d)
fun1(10,20,c=30,d=40)

def fun4(**a):
    print(a)

fun4(**dic)

#顺序问题
def fun5(a,b,*,c,d,**args):
    pass
def fun6(*args,**args2):
    pass
def fun7(a,b=10,*args,**arg2s):
    pass
输出结果:
11
22
33
111
222
333
10
20
30
40
{‘a’: 111, ‘b’: 222, ‘c’: 333}
函数内部定义的变量前面加global可以让该变量变为全局变量
递归函数
每递归调用一次都会在栈内存分配一个栈帧 。
斐波那契数列实例:
def fib(n):
    if n==1:
        return 1
    elif n==2:
        return 1
    else:
        return fib(n-1)+fib(n-2)
for i in range(1,7):
    print(fib(i))
bug修复例子
lst=[{'title':'肖申克的救赎','actor':['蒂姆罗宾斯','摩根里夫曼']},
     {'title':'霸王别姬','actor':['张国荣','张丰毅','功利','葛优']},
     {'title':'阿甘正传','actor':['汤姆汉克斯','罗宾怀特']}
     ]

name=input('请输入你要查询的演员:')

for item in lst:
    namelst=item['actor']
    for actor in namelst:
        if name in actor:
            print(f'{name}出演了%s' % item['title'])
异常处理机制:
try:
    n1=int(input('请输入一个整数:'))
    n2=int(input('请输入另一个整数'))
    result=n1/n2
    print('结果为',result)
except ZeroDivisionError:
    print('对不起,除数不允许为0')
except ValueError:
    print('只能输入数字串')
except BaseException:
    print('出错')
print('程序结束')
try…except…else结构,如果try没有抛出异常,则执行else块,如果try中抛出异常,则执行except块。
try:
    a = int(input('请输入第一个整数'))
    b = int(input('请输入第二个整数'))
    result = a / b
except BaseException as e:
    print('出错了',e)
else:
    print('结算结果为',result)
try…except…else…finally,finally块无论是否发生异常都会被执行,能常用来释放try块中申请的资源
try:
    a = int(input('请输入第一个整数'))
    b = int(input('请输入第二个整数'))
    result = a / b
except BaseException as e:
    print('出错了',e)
else:
    print('结算结果为',result)
finally:
    print('谢谢您的使用')
Python常见的异常类型
| 序号 | 异常类型 | 描述 |
| 1 | ZeroDivisionError | 除(或取模)零(所有数据类型) |
| 2 | IndexError | 序列中没有此索引(index) |
| 3 | KeyError | 映射中没有这个键 |
| 4 | NameError | 未声明/初始化对象(没有属性) |
| 5 | SyntaxError | Python 语法错误 |
| 6 | ValueError | 传入无效的参数 |
traceback模块:使用该模块打印异常信息
import traceback
try:
    print('----------')
    print(1/0)
except:
    traceback.print_exc()
定义Python中的类
class Student:
    native_place='深圳'#直接写在类里的变量,称为类属性

    def __int__(self,name,age):
        self.name=name  #实体属性
        self.age=age

    def eat(self):
        print('学生在吃饭...')#类里定义的叫方法,类外叫函数

    @staticmethod
    def method():
        print('静态方法')

    @classmethod
    def cm(cls):
        print('我是类方法')

#Python中的一切皆是对象,内存有开空间。
创建对象
class Student:
    native_place='深圳'#直接写在类里的变量,称为类属性

    def __init__(self,name,age):
        self.name=name  #实体属性
        self.age=age

    def eat(self):
        print('学生在吃饭...')#类里定义的叫方法,类外叫函数

    @staticmethod
    def method():
        print('静态方法')

    @classmethod
    def cm(cls):
        print('我是类方法')

#Python中的一切皆是对象,内存有开空间。

stu1=Student('张三',20)
print(id(stu1))#输出地址
print(type(stu1))#类型
print(stu1)#地址
print('===============')
print(id(Student))
print(type(Student))
print(Student)

Student.eat(stu1)#两种调用方法
输出结果:
1792242521376
<class ‘__main__.Student’>
<__main__.Student object at 0x000001A149FA9520>
===============
1792235695104
<class ‘type’>
<class ‘__main__.Student’>
类属性:类中方法外的变量称为类属性,被该类的所有对象所共享
类方法:使用@classmethod修饰的方法,使用类名直接访问的方法
静态方法:使用@staticmethod修饰的方法,使用类名直接访问的方法
动态绑定属性和方法
class Student:
    native_place='深圳'#直接写在类里的变量,称为类属性

    def __init__(self,name,age):
        self.name=name  #实体属性
        self.age=age

    def eat(self):
        print(self.name+'学生在吃饭...')#类里定义的叫方法,类外叫函数

stu1=Student('张三',20)
stu2=Student('李四',30)
stu2.gender='女'#动态绑定属性

def show():
    print('定义在类之外的')
stu1.show=show()#动态绑定方法
封装的实现
在Python中,没有专门的修饰符属于属性的私有,如果该属性不希望在类对象外部被访问,前边使用两个”__”
class Student:
    def __init__(self,name,age):
        self.name=name
        self.__age=age#年龄不希望在类的外部被使用

    def show(self):
        print(self.name,self.__age)

stu = Student('张三',20)
stu.show()
#在类的外使用使用name和age
#print(stu.__age)
print(dir(stu))
print(stu._Student__age)#可以访问但不建议
继承
class Person(object):
    def __init__(self,name,age):
        self.name=name
        self.age=age
    def info(self):
        print(self.name,self.age)

class Student(Person):
    def __init__(self,name,age,stu_num):
        super().__init__(name,age)
        self.stu_num=stu_num

class Teacher(Person):
    def __init__(self,name,age,yearofteaching):
        super().__init__(name,age)
        self.yearofteaching=yearofteaching


stu=Student('张三',20,1)
tea=Teacher('李四',30,3)

stu.info()
tea.info()
并且python中可以有多继承
重写正常写方法就可以
object类
内置函数dir()可以查看指定对象的所有属性。
Object有一个__str__()方法,用于返回一个’对于对象的描述‘对应于内置函数str()经常用于print()方法,帮我们查看对象的信息,所以我们常会对__str__()进行重写
class Student:
    def __init__(self,name,age):
        self.name=name
        self.age=age
    def __str__(self):
        return '我的名字是{0},今年{1}岁'.format(self.name,self.age)
stu=Student('张三',20)
print(dir(stu))
print(stu)
print(type(stu))
多态
鸭子类型,动态语言Python只关心是否具有这个方法不管你是否有父子类关系
class Animal(object):
    def eat(self):
        print('动物会吃')

class Dog(Animal):
    def eat(self):
        print('狗吃骨头')

class Cat(Animal):
    def eat(self):
        print('猫吃鱼')

class Person:
    def eat(self):
        print('人吃五谷杂粮')

def fun(obj):
    obj.eat()

fun(Cat())
fun(Dog())
fun(Animal())
print('--------')
fun(Person())
特殊属性
#__dict__获得类对象或实例对象所绑定的所有属性和方法的字典
class A:
    pass

class B:
    pass

class C(A,B):
    def __init__(self,name,age):
        self.name=name
        self.age=age

x=C('Jack',20)
print(x.__dict__)#输出实例对象的属性字典
print(C.__dict__)#输出类的对象字典

print(x.__class__)#<class '__main__.C'>输出了对象所属的类
print(C.__bases__)#输出C类父类类型的元组
print(C.__base__)#离他最近的父类
print(C.__mro__)#类的层次结构
print(A.__subclasses__())#输出A的子类列表
特殊方法
#add和len方法
class Student:
    def __init__(self,name):
        self.name=name
    def __add__(self, other):
        return self.name+other.name
    def __len__(self):
        return len(self.name)

stu1=Student('张三')
stu2=Student('李四')
s=stu1+stu2
print(s)
print(stu1.__len__())
print(len(stu1))
new与init创建对象过程
#new方法
class Person(object):
 def __new__(cls, *args, **kwargs):
        print('new被调用执行了,cls的id值为{0}'.format(id(cls)))
        obj=super().__new__(cls)
        print('创建的对象id为{0}'.format(id(obj)))
        return obj


    def __init__(self,name,age):
        self.name=name
        self.age=age


print('object这个类的对象id为{0}'.format(id(object)))
print('Person这个类对象的id为{0}'.format(id(Person)))

p1=Person('张三',20)
print('p1这个Person类的实例对象id为{0}'.format(id(p1)))
输出结果:
object这个类的对象id为140717676194640
Person这个类对象的id为2649027430288
new被调用执行了,cls的id值为2649027430288
创建的对象id为2649027214400
p1这个Person类的实例对象id为2649027214400
类的浅拷贝与深拷贝
class CPU:
    pass
class Disk:
    pass
class Computer:
    def __init__(self,cpu,disk):
        self.cpu=cpu
        self.disk=disk

cpu1=CPU()
cpu2=cpu1
print(cpu1,id(cpu1))
print(cpu2,id(cpu2))
print('---------')
disk=Disk()
computer=Computer(cpu1,disk)

import copy
computer2=copy.copy(computer)
print(computer,computer.cpu,computer.disk)
print(computer2,computer2.cpu,computer2.disk)

print("---------------")
#深拷贝
computer3=copy.deepcopy(computer)
print(computer,computer.cpu,computer.disk)
print(computer3,computer3.cpu,computer3.disk)
输出结果:
<__main__.CPU object at 0x00000285642B8400> 2771934479360
<__main__.CPU object at 0x00000285642B8400> 2771934479360
———
<__main__.Computer object at 0x0000028564827C70> <__main__.CPU object at 0x00000285642B8400> <__main__.Disk object at 0x0000028564296100>
<__main__.Computer object at 0x0000028564839520> <__main__.CPU object at 0x00000285642B8400> <__main__.Disk object at 0x0000028564296100>
—————
<__main__.Computer object at 0x0000028564827C70> <__main__.CPU object at 0x00000285642B8400> <__main__.Disk object at 0x0000028564296100>
<__main__.Computer object at 0x000002856486AD90> <__main__.CPU object at 0x00000285648771C0> <__main__.Disk object at 0x0000028564877190>
变量的赋值操作:
只是形成两个变量,实际上还是指向同一个对象
浅拷贝:
Python拷贝一般都是浅拷贝,拷贝时,对象包含的子对象内容不拷贝,因此,源对象与拷贝对象会引用同一个子对象
深拷贝:
使用copy模块的deepcopy函数,递归拷贝对象中包含的子对象,源对象和拷贝对象所有的子对象也不相同。
模块的导入
import math#数学运算
print(id(math))
print(type(math))
print(math)
print('--------')
print(math.pi)
print(dir(math))
print(math.pow(2,3),type(math.pow(2,3)))
print(math.ceil(9.001))#向上取整
print(math.floor)#向下取整
from math import  pi
print(pi)
右键目录标记为根目录可导入自己创建的模块
以主程序方式运行:
def add(a,b):
    return a+b
def div(a,b):
    return a/b

if __name__ == '__main__':#只有点击运行该文件时,才会执行运算
     print(add(2,3))
包
import package1.module_A as ma#包名.模块名称
print(ma.a)

#导入带有包的模块时注意事项
import package1
import calc
#使用import方式进行导入时,只能根包名或模块名

from package1 import module_A
from package1.module_A import a
#使用from...impor可以导入包,模块,函数,变量
常用内容模块
import sys#与Python解释器及其环境操作相关的标准库
print(sys.getsizeof(24))
print(sys.getsizeof(28))
print(sys.getsizeof(True))
print(sys.getsizeof(False))

import time#提供了事件相关的各种函数的标准库
print(time.time())
print(time.localtime(time.time()))

import urllib.request#用于读取来自网上服务器的数据标准库
print(urllib.request.urlopen('http://www.baidu.com').read())

import math#提供标准算术运算函数的标准库
print(math.pi)

import decimal#用于进行精确控制运算精度、有效数位和四舍五入的十进制运算

import os#提供了访问操作系统服务功能的标准库

import calendar#提供了与日期相关的各种函数的标准库

import json#用于JSON序列化和反序列化对象

import re#用于在字符串中执行正则表达式匹配和替换

import logging#提供了灵活的记录事件、错误、警告和调试信息等日志信息功能
第三方功能包
import schedule#pip install schedule安装
import time

def job():
    print('哈哈-')

schedule.every(3).seconds.do(job)
while True:
    schedule.run_pending()
    time.sleep(1)
编码格式
#Python的解释器使用的是Unicode(内存)
#.py文件在cipanshang
#通过encoding=gbk改编码格式,默认为utf-8
文件读写操作
#读取文件
file=open('a.txt','r')
print(file.readlines())
file.close()

#写文件
file1=open('b.txt','w')
file1.write('helloworld')
file1.close()
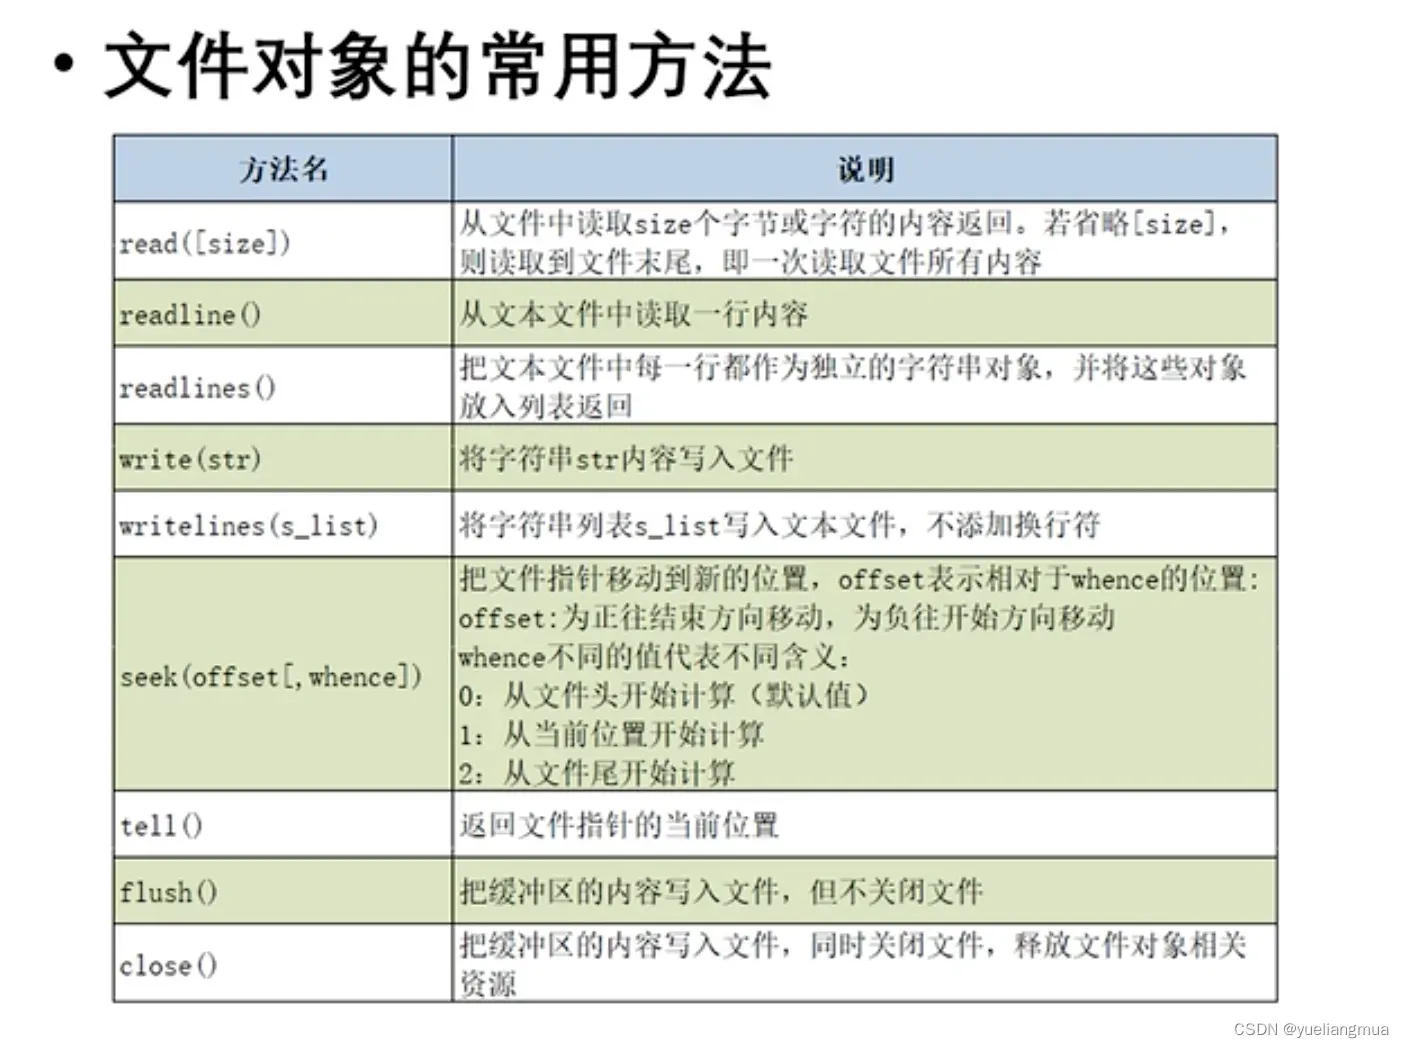
with语句
with open('a.txt','r') as file:#with调用上下文管理器执行enter和exit方法
    print(file.read())
os模块的常用函数
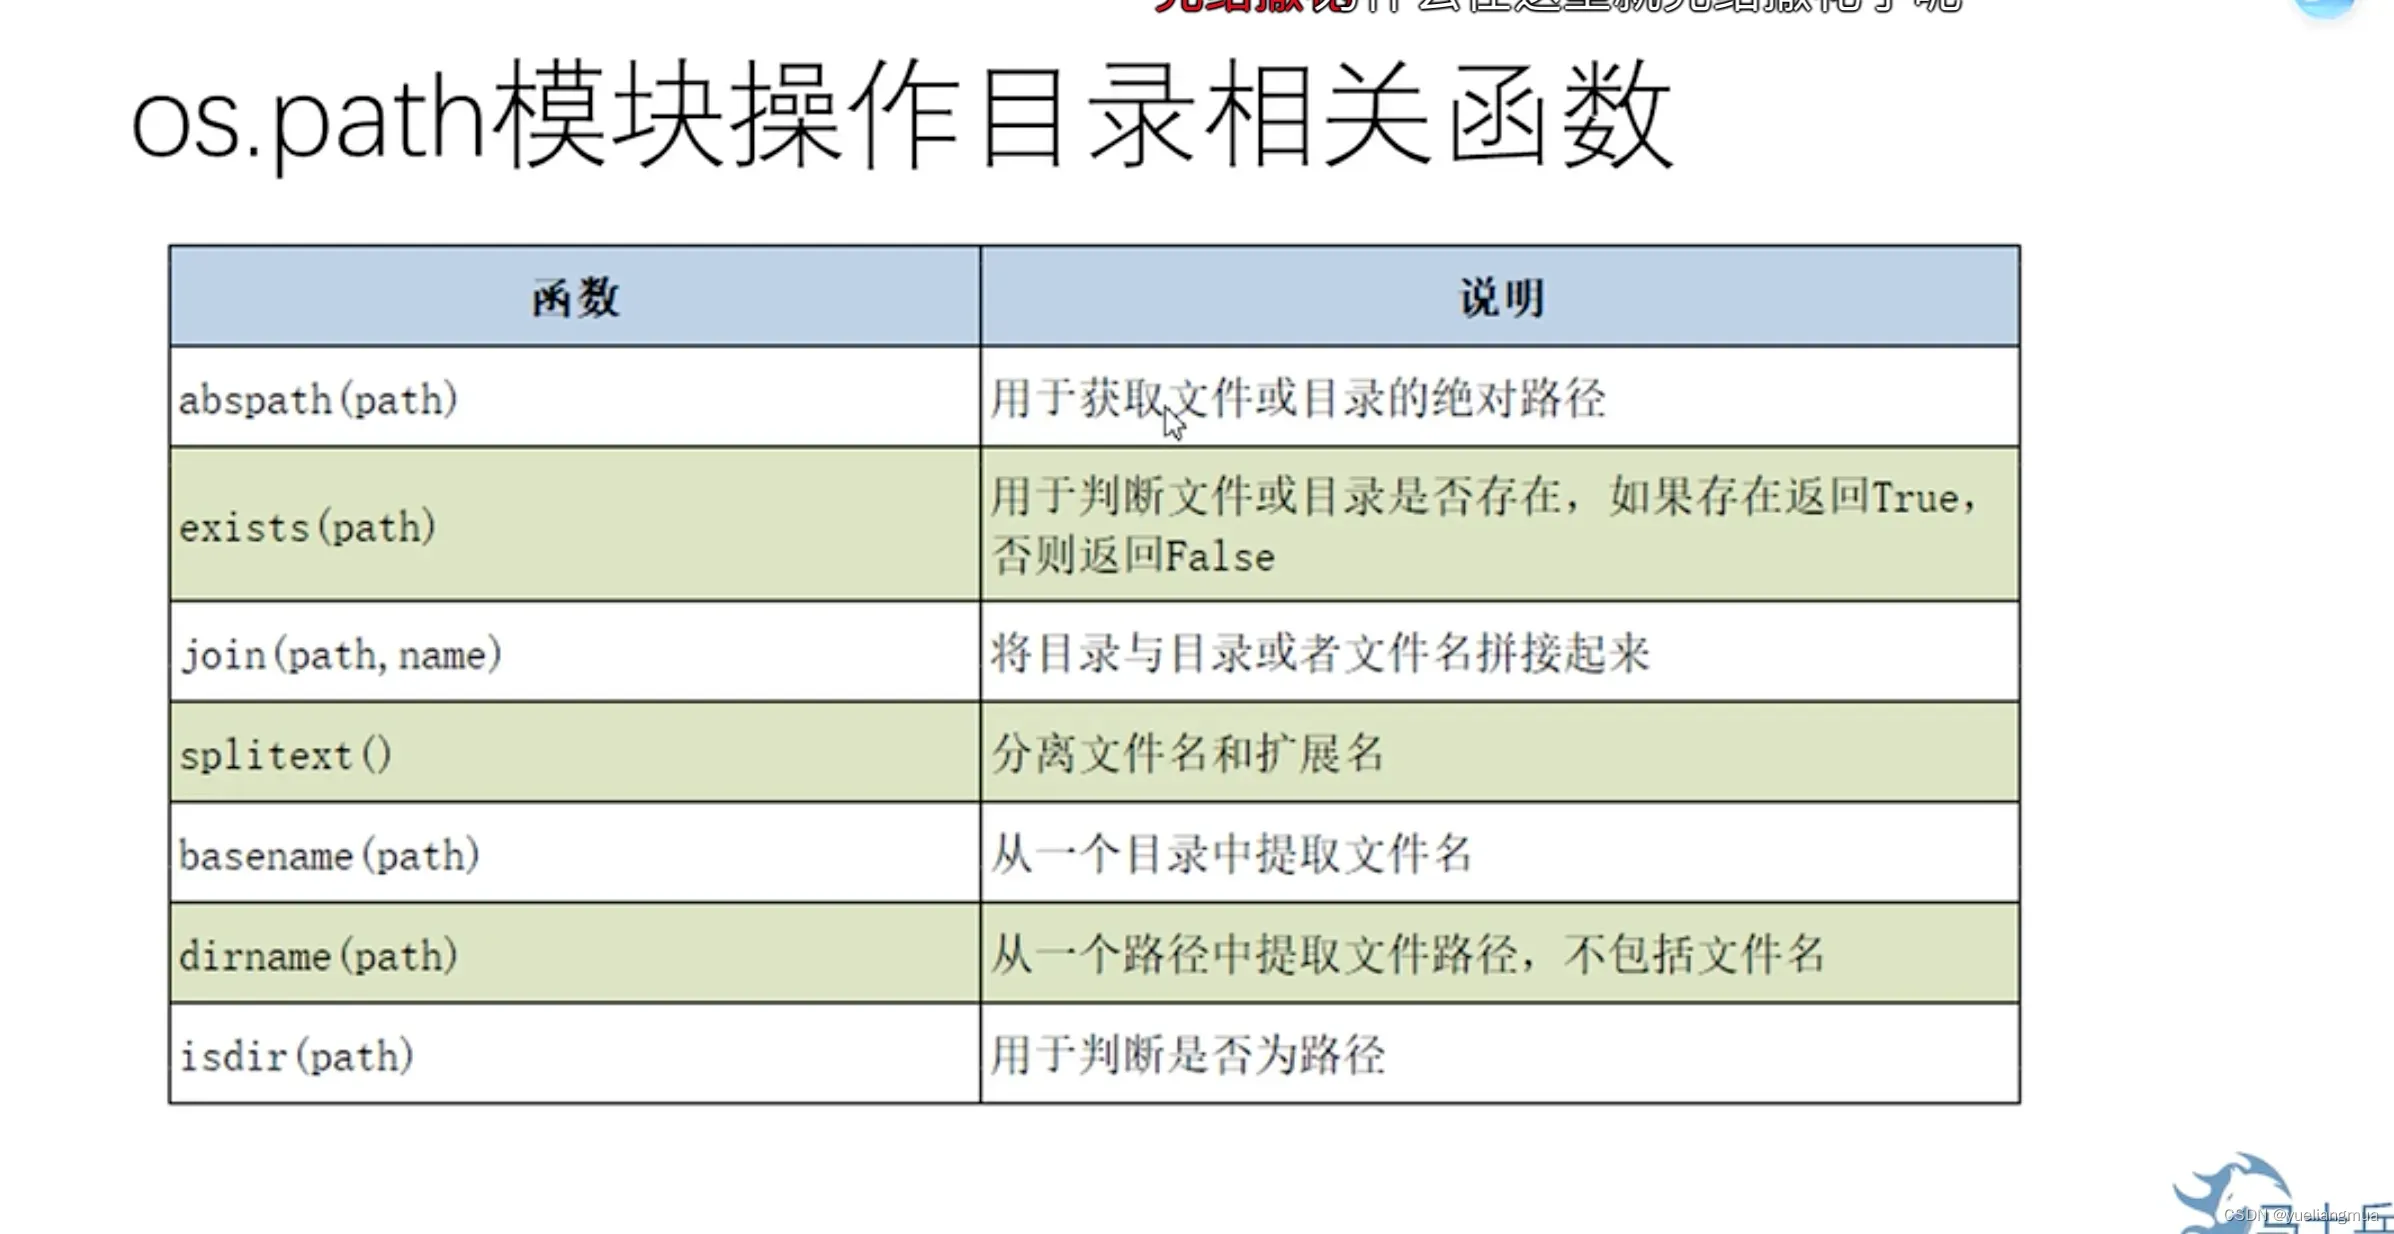
#os模块与操作系统相关的一个模块
import os
'''os.system('notepad.exe')
os.system('calc.exe')'''


os.startfile('C:\\Program Files (x86)\\Tencent\\QQ\\Bin')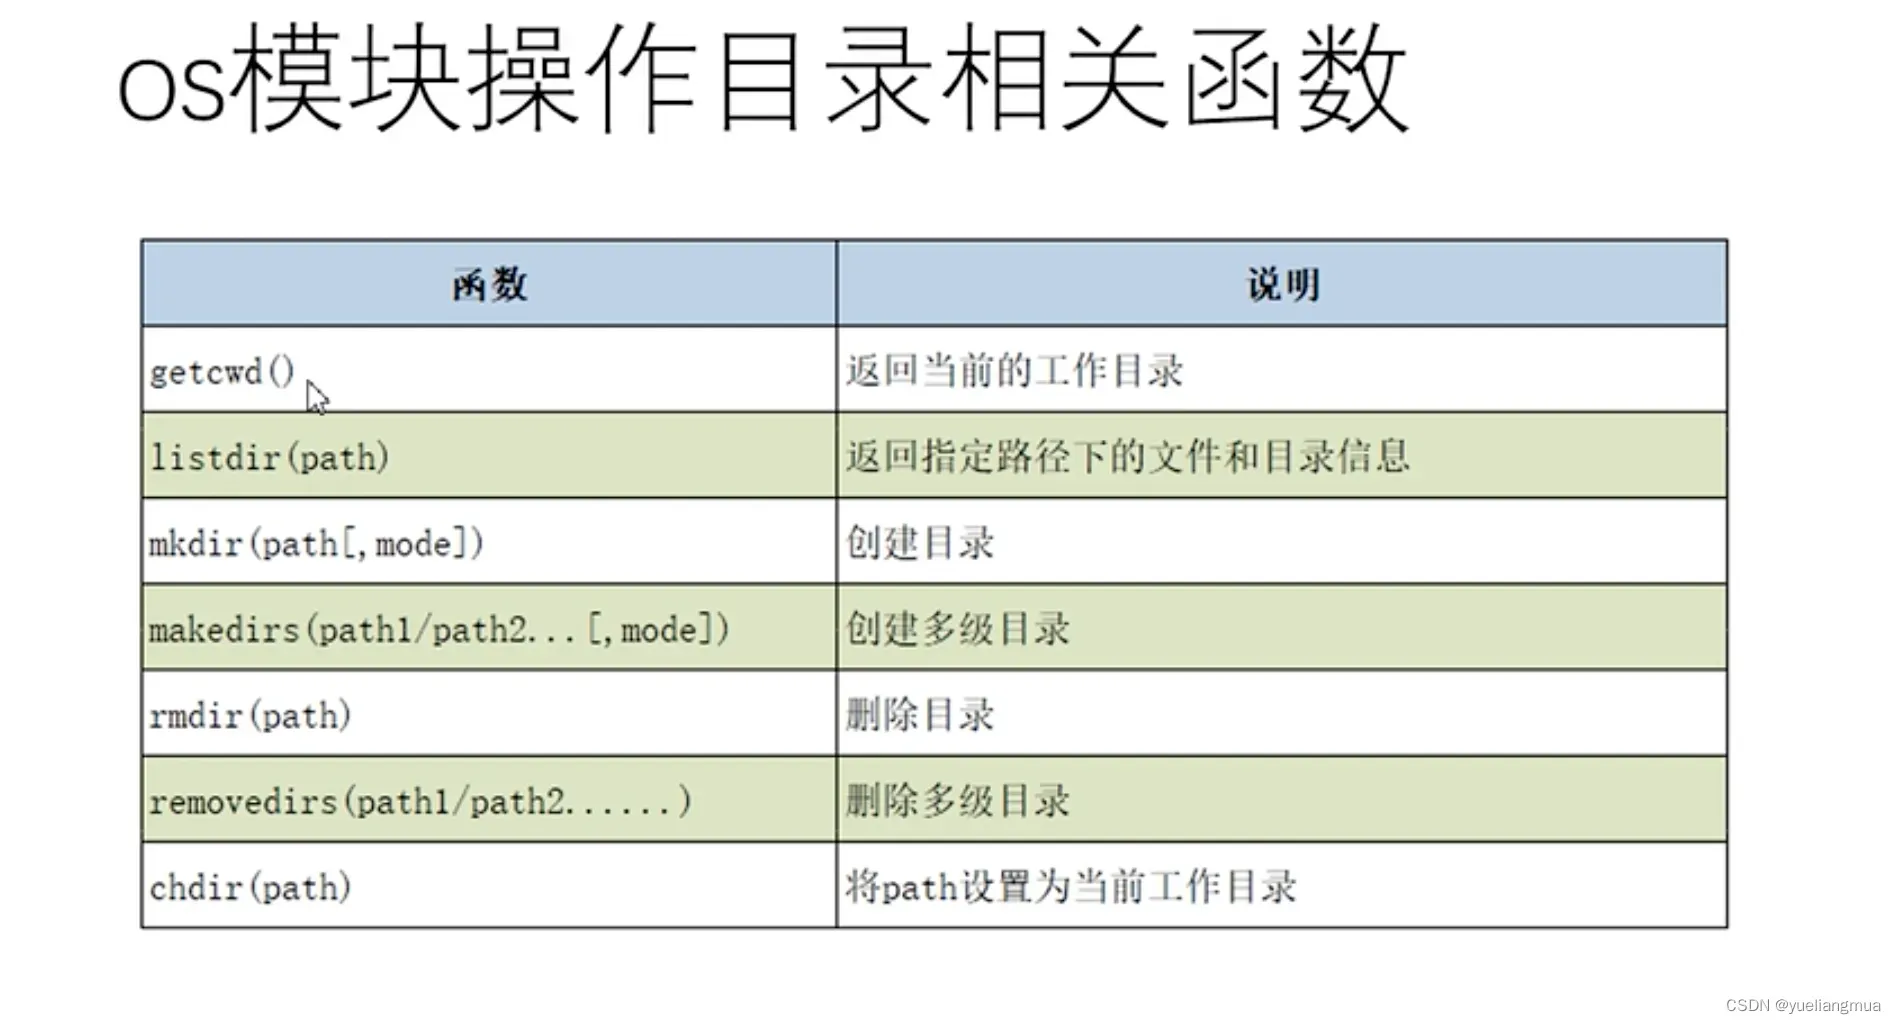
文章出处登录后可见!