官方的segformer源码是基于MMCV框架,整体包装较多,自己不便于阅读和学习,我这里使用的是Bubbliiiing大佬github复现的segformer版本。
Bubbliiiing大佬代码下载链接:
https://github.com/bubbliiiing/segformer-pytorch
大佬的代码很优秀简练,注释也很详细,代码里采用的是VOC数据集的格式,因此只需要把cityscapes数据格式修改即可。
目录
- 一、Segformer模型结构
- 1.OverlapPatchEmbed模块
- 2.Self-Attention模块
- 3.MixFFN模块
- 4.拼接融合与MLP解码
- 二、cityscapes代码修改
- 1.数据集文件夹格式
- 2.修改dataloader.py文件
- 3.获取RGB预测图
一、Segformer模型结构
Segformer特点:transformer + 特征融合 + 轻量级MLP + 选择3*3卷积并舍弃位置编码
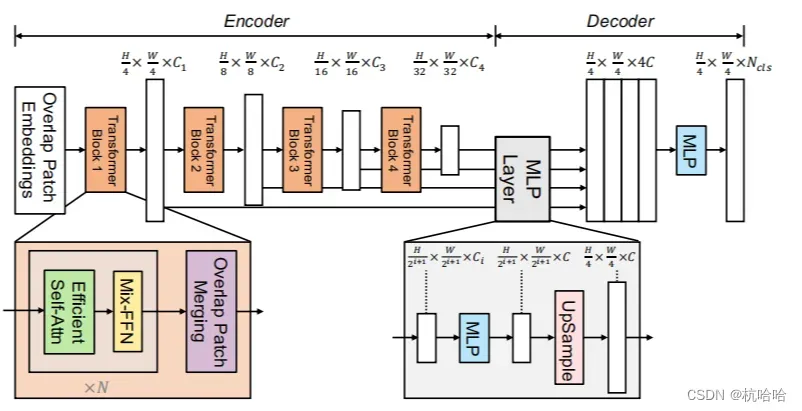
1.OverlapPatchEmbed模块
分割输入图像,使用卷积操作将输入图像分成大小为 patch_size 的块,并使用步幅为 stride 移动这些块以创建重叠块。然后对每个块进行一维向量化,并通过标准化层进行标准化。该模块的输出包含一个形状为 (B, N, C) 的张量,其中 B 是批大小,N 是每个块中像素数量的数量,C 是嵌入维度。此外,该模块还返回 H W,这是输入图像的大小,因为在解码时需要了解原始图像的大小。
class OverlapPatchEmbed(nn.Module):
    def __init__(self, patch_size=7, stride=4, in_chans=3, embed_dim=768):
        super().__init__()
        patch_size  = (patch_size, patch_size) #7*7
        self.proj   = nn.Conv2d(in_chans, embed_dim, kernel_size=patch_size, stride=stride,
                              padding=(patch_size[0] // 2, patch_size[1] // 2))
        self.norm   = nn.LayerNorm(embed_dim)

        self.apply(self._init_weights)

    def forward(self, x):
        x = self.proj(x)
        _, _, H, W = x.shape
        x = x.flatten(2).transpose(1, 2)
        x = self.norm(x)

        return x, H, W
2.Self-Attention模块
关于Self-Attention原理,可以去看这个大佬的文章,讲的很详细:https://zhuanlan.zhihu.com/p/410776234
核心为这个公式: Segformer中做了些改进。
class Attention(nn.Module):
    def __init__(self, dim, num_heads=8, qkv_bias=False, qk_scale=None, attn_drop=0., proj_drop=0., sr_ratio=1):
        super().__init__()
        assert dim % num_heads == 0, f"dim {dim} should be divided by num_heads {num_heads}."

        self.dim        = dim
        self.num_heads  = num_heads
        head_dim        = dim // num_heads
        self.scale      = qk_scale or head_dim ** -0.5

        self.q          = nn.Linear(dim, dim, bias=qkv_bias)

        self.sr_ratio = sr_ratio
        if sr_ratio > 1:
            self.sr     = nn.Conv2d(dim, dim, kernel_size=sr_ratio, stride=sr_ratio)
            self.norm   = nn.LayerNorm(dim)
        self.kv         = nn.Linear(dim, dim * 2, bias=qkv_bias)

        self.attn_drop  = nn.Dropout(attn_drop)

        self.proj       = nn.Linear(dim, dim)
        self.proj_drop  = nn.Dropout(proj_drop)

        self.apply(self._init_weights)

    def forward(self, x, H, W):
        B, N, C = x.shape
        # bs, 16384, 32 => bs, 16384, 32 => bs, 16384, 8, 4 => bs, 8, 16384, 4
        q = self.q(x).reshape(B, N, self.num_heads, C // self.num_heads).permute(0, 2, 1, 3)

        if self.sr_ratio > 1:
            # bs, 16384, 32 => bs, 32, 128, 128
            x_ = x.permute(0, 2, 1).reshape(B, C, H, W)
            # bs, 32, 128, 128 => bs, 32, 16, 16 => bs, 256, 32
            x_ = self.sr(x_).reshape(B, C, -1).permute(0, 2, 1)
            x_ = self.norm(x_)
            # bs, 256, 32 => bs, 256, 64 => bs, 256, 2, 8, 4 => 2, bs, 8, 256, 4
            kv = self.kv(x_).reshape(B, -1, 2, self.num_heads, C // self.num_heads).permute(2, 0, 3, 1, 4)
        else:
            kv = self.kv(x).reshape(B, -1, 2, self.num_heads, C // self.num_heads).permute(2, 0, 3, 1, 4)
        k, v = kv[0], kv[1]

        # bs, 8, 16384, 4 @ bs, 8, 4, 256 => bs, 8, 16384, 256
        attn = (q @ k.transpose(-2, -1)) * self.scale
        attn = attn.softmax(dim=-1)
        attn = self.attn_drop(attn)

        # bs, 8, 16384, 256  @ bs, 8, 256, 4 => bs, 8, 16384, 4 => bs, 16384, 32
        x = (attn @ v).transpose(1, 2).reshape(B, N, C)
        # bs, 16384, 32 => bs, 16384, 32
        x = self.proj(x)
        x = self.proj_drop(x)

        return x
3.MixFFN模块

不同于VIT,segformer舍弃了位置编码,使用3×3的卷积构建了MixFFN模块。
class Mlp(nn.Module):
    def __init__(self, in_features, hidden_features=None, out_features=None, act_layer=GELU, drop=0.):
        super().__init__()
        out_features    = out_features or in_features
        hidden_features = hidden_features or in_features

        self.fc1    = nn.Linear(in_features, hidden_features)
        self.dwconv = DWConv(hidden_features)
        self.act    = act_layer()

        self.fc2    = nn.Linear(hidden_features, out_features)

        self.drop   = nn.Dropout(drop)

        self.apply(self._init_weights)

    def forward(self, x, H, W):
        x = self.fc1(x)
        x = self.dwconv(x, H, W)
        x = self.act(x)
        x = self.drop(x)
        x = self.fc2(x)
        x = self.drop(x)
        return x
4.拼接融合与MLP解码
这部分就是把前面的拼接然后输出。

    def forward(self, inputs):
        c1, c2, c3, c4 = inputs

        ############## MLP decoder on C1-C4 ###########
        n, _, h, w = c4.shape

        _c4 = self.linear_c4(c4).permute(0,2,1).reshape(n, -1, c4.shape[2], c4.shape[3])
        _c4 = F.interpolate(_c4, size=c1.size()[2:], mode='bilinear', align_corners=False)

        _c3 = self.linear_c3(c3).permute(0,2,1).reshape(n, -1, c3.shape[2], c3.shape[3])
        _c3 = F.interpolate(_c3, size=c1.size()[2:], mode='bilinear', align_corners=False)

        _c2 = self.linear_c2(c2).permute(0,2,1).reshape(n, -1, c2.shape[2], c2.shape[3])
        _c2 = F.interpolate(_c2, size=c1.size()[2:], mode='bilinear', align_corners=False)

        _c1 = self.linear_c1(c1).permute(0,2,1).reshape(n, -1, c1.shape[2], c1.shape[3])

        _c = self.linear_fuse(torch.cat([_c4, _c3, _c2, _c1], dim=1))

        x = self.dropout(_c)
        x = self.linear_pred(x)

        return x
二、cityscapes代码修改
1.数据集文件夹格式
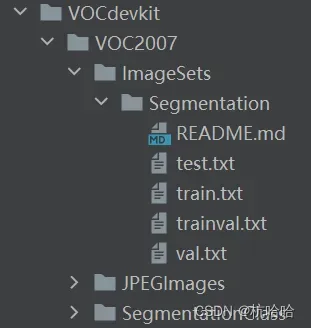
这里数据集标签图片需要为灰度图或者八位彩图,标签的每个像素点的值就是这个像素点所属的种类。
因此,使用cityscapes几个标签中的 _labelIds.png标签。
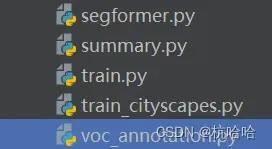
数据集划分按自己需求修改voc_annotation.py文件
2.修改dataloader.py文件
原本的这个标签中的类别是0到33和-1,我做的19类别分割。修改dataloader.py文件:
我这里直接复制了我之前使用过的encode_target内容加入进去:
CityscapesClass = namedtuple('CityscapesClass', ['name', 'id', 'train_id', 'category', 'category_id',
                                                     'has_instances', 'ignore_in_eval', 'color'])
    classes = [
        CityscapesClass('unlabeled',            0, 19, 'void', 0, False, True, (0, 0, 0)),
        CityscapesClass('ego vehicle',          1, 19, 'void', 0, False, True, (0, 0, 0)),
        CityscapesClass('rectification border', 2, 19, 'void', 0, False, True, (0, 0, 0)),
        CityscapesClass('out of roi',           3, 19, 'void', 0, False, True, (0, 0, 0)),
        CityscapesClass('static',               4, 19, 'void', 0, False, True, (0, 0, 0)),
        CityscapesClass('dynamic',              5, 19, 'void', 0, False, True, (111, 74, 0)),
        CityscapesClass('ground',               6, 19, 'void', 0, False, True, (81, 0, 81)),
        CityscapesClass('road',                 7, 0, 'flat', 1, False, False, (128, 64, 128)),
        CityscapesClass('sidewalk',             8, 1, 'flat', 1, False, False, (244, 35, 232)),
        CityscapesClass('parking',              9, 19, 'flat', 1, False, True, (250, 170, 160)),
        CityscapesClass('rail track',           10, 19, 'flat', 1, False, True, (230, 150, 140)),
        CityscapesClass('building',             11, 2, 'construction', 2, False, False, (70, 70, 70)),
        CityscapesClass('wall',                 12, 3, 'construction', 2, False, False, (102, 102, 156)),
        CityscapesClass('fence',                13, 4, 'construction', 2, False, False, (190, 153, 153)),
        CityscapesClass('guard rail',           14, 19, 'construction', 2, False, True, (180, 165, 180)),
        CityscapesClass('bridge',               15, 19, 'construction', 2, False, True, (150, 100, 100)),
        CityscapesClass('tunnel',               16, 19, 'construction', 2, False, True, (150, 120, 90)),
        CityscapesClass('pole',                 17, 5, 'object', 3, False, False, (153, 153, 153)),
        CityscapesClass('polegroup',            18, 19, 'object', 3, False, True, (153, 153, 153)),
        CityscapesClass('traffic light',        19, 6, 'object', 3, False, False, (250, 170, 30)),
        CityscapesClass('traffic sign',         20, 7, 'object', 3, False, False, (220, 220, 0)),
        CityscapesClass('vegetation',           21, 8, 'nature', 4, False, False, (107, 142, 35)),
        CityscapesClass('terrain',              22, 9, 'nature', 4, False, False, (152, 251, 152)),
        CityscapesClass('sky',                  23, 10, 'sky', 5, False, False, (70, 130, 180)),
        CityscapesClass('person',               24, 11, 'human', 6, True, False, (220, 20, 60)),
        CityscapesClass('rider',                25, 12, 'human', 6, True, False, (255, 0, 0)),
        CityscapesClass('car',                  26, 13, 'vehicle', 7, True, False, (0, 0, 142)),
        CityscapesClass('truck',                27, 14, 'vehicle', 7, True, False, (0, 0, 70)),
        CityscapesClass('bus',                  28, 15, 'vehicle', 7, True, False, (0, 60, 100)),
        CityscapesClass('caravan',              29, 19, 'vehicle', 7, True, True, (0, 0, 90)),
        CityscapesClass('trailer',              30, 19, 'vehicle', 7, True, True, (0, 0, 110)),
        CityscapesClass('train',                31, 16, 'vehicle', 7, True, False, (0, 80, 100)),
        CityscapesClass('motorcycle',           32, 17, 'vehicle', 7, True, False, (0, 0, 230)),
        CityscapesClass('bicycle',              33, 18, 'vehicle', 7, True, False, (119, 11, 32)),
        CityscapesClass('license plate',        -1, 19, 'vehicle', 7, False, True, (0, 0, 142)),
    ]

    id_to_train_id = np.array([c.train_id for c in classes])
    def encode_target(cls, png):
        return cls.id_to_train_id[np.array(png)]
同时修改def getitem(self, index)函数:
修改一下split,原本的voc的标签和图像名称一样,加个image_name,然后加个png = self.encode_target(png)
    def __getitem__(self, index):
        annotation_line = self.annotation_lines[index]
        name            = annotation_line.split()[0]

        #-------------------------------#
        #   从文件中读取图像
        #-------------------------------#
        image_name = annotation_line.split('_gtFine_labelIds')[0] + '_leftImg8bit'
        jpg = Image.open(os.path.join(os.path.join(self.dataset_path, "VOC2007/JPEGImages"), image_name + ".png"))
        #jpg         = Image.open(os.path.join(os.path.join(self.dataset_path, "VOC2007/JPEGImages"), name + ".png"))
        png         = Image.open(os.path.join(os.path.join(self.dataset_path, "VOC2007/SegmentationClass"), name + ".png"))
        #-------------------------------#
        #   数据增强
        #-------------------------------#
        jpg, png    = self.get_random_data(jpg, png, self.input_shape, random = self.train)

        jpg         = np.transpose(preprocess_input(np.array(jpg, np.float64)), [2,0,1])
        png         = np.array(png)
        png = self.encode_target(png)
        #png[png >= self.num_classes] = self.num_classes
        #-------------------------------------------------------#
        #   转化成one_hot的形式
        #   在这里需要+1是因为voc数据集有些标签具有白边部分
        #   我们需要将白边部分进行忽略,+1的目的是方便忽略。
        #-------------------------------------------------------#
        seg_labels  = np.eye(self.num_classes + 1)[png.reshape([-1])]
        seg_labels  = seg_labels.reshape((int(self.input_shape[0]), int(self.input_shape[1]), self.num_classes + 1))

        return jpg, png, seg_labels
3.获取RGB预测图
get_miou.py文件中生成的图为灰度图,看到的是近似全黑的图。如果想要预测出来的是RGB图,将预测结果中每个像素的类别转换成RGB颜色值。因此另外写了一个映射函数,通过定义一个颜色映射表,将每个类别映射到一个RGB颜色值,并输出保存。
def CityscapesLABELtoRGB():
    # 定义RGB颜色映射关系
    color_map = {
        0: [128, 64, 128],
        1: [244, 35, 232],
        2: [70, 70, 70],
        3: [102, 102, 156],
        4: [190, 153, 153],
        5: [153, 153, 153],
        6: [250, 170, 30],
        7: [220, 220, 0],
        8: [107, 142, 35],
        9: [152, 251, 152],
        10: [70, 130, 180],
        11: [220, 20, 60],
        12: [255, 0, 0],
        13: [0, 0, 142],
        14: [0, 0, 70],
        15: [0, 60, 100],
        16: [0, 80, 100],
        17: [0, 0, 230],
        18: [119, 11, 32],
        19: [0, 0, 0]
    }

    # 加载类别标签图像
    label_path = "miou_out/detection-results"
    rgb_folder_path = "RGB"
    for file_name in os.listdir(label_path):
        # 加载类别标签图像
        rgb_path = os.path.join(label_path, file_name)
        img = Image.open(rgb_path)
        label_arr = np.array(img)

        # 将类别标签转换为RGB标签
        rgb_arr = np.zeros((label_arr.shape[0], label_arr.shape[1], 3), dtype=np.uint8)
        for key, value in color_map.items():
            rgb_arr[label_arr == key] = value

        # 将RGB标签保存为PNG图像

        rgb_path = os.path.join(rgb_folder_path, os.path.splitext(file_name)[0] + ".png")
        label_img = Image.fromarray(rgb_arr)
        label_img.save(rgb_path, "PNG", quality=100, bitdepth=8)
文章出处登录后可见!