目录
一、简介
1.1 pytest单元测试框架
1、什么是单元测试框架:
单元测试是指在软件开发当中,针对软件的最小单位(函数,方法)进行正确性的检查测试
2、单元测试框架:
java:junit和testing
python:unittest和pytest
3、单元测试框架主要做什么:
1.测试发现:从多个文件里面去找到我们测试用例
2.测试执行:按照一定的顺序和规则去执行,并生成结果
3.测试判断:通过断言判断预期结果和实际结果的差异
4.测试报告:统计测试进度、耗时、通过率,生成测试报告
1.2 单元测试框架和自动化测试框架有什么关系
1、什么是自动化测试框架
自动化测试组长针对一个项目开发的一个代码框架,这个框架封装了很多的基础模块,报告模块等等。
2、作用
1.提供测试效率,降低维护成本
2.减少人工干预,提高测试的准确性,增加代码的重用性
3.核心思想是让不懂代码的人也能够通过这个框架去实现自动化测试
3、pytest单元测试框架和自动化测试框架的关系
单元测试框架:只是自动化测试框架中的组成部分之一
pom设计模式:只是自动化测试框架中的组成部分之一
数据驱动…..
关键字驱动
全局配置文件的封装
日志监控
selenium、requests二次封装
断言
报告邮件
更多……..
1.3 pytest简介
1.pytest是一非常成熟的python单元框架,比unittest更灵活,容易上手
2.pytest可以和selenium、requests、appium结合实现web自动化,接口自动化,app自动化
3.pytest可以实现测试用例的跳过以及reruns失败用例重试
4.pytest可以和allure生成非常美观的测试报告
5.pytest可以和jenkins持续集成
6.pytest有很多非常强大的插件,并且这些插件能够实现很多的实用的操作
pytest
pytest-xdist 测试用例分布式执行,多cpu并发
pytest-ordering 用于改变测试用例的执行顺序
pytest-rerunfailures 用于失败后重跑
pytest-html (生成html格式的自动化测试报告)
allure-pytest 用于生成美观的测试报告
1.4 pytest安装
1.4.1 pycharm中插件安装:
在文件中新建一个requirements.txt文件,在Terminal中输入命令pip install -r requirements.txt,会在当前文件夹下安装该插件(非全局,仅当前文件夹可用,若想全局环境使用,则在dos(cmd)窗口安装)
文件内容:
pytest
pytest-xdist
pytest-ordering
pytest-rerunfailures
pytest-html
allure-pytest
1.4.2 dos(cmd)窗口安装:
pip install pytest
pip install pytest-xdist
pip install pytest-ordering
pip install pytest-rerunfailures
pip install pytest-html pip install allure-pytest
验证是否安装成功:pytest –version
1.5 使用pytest,默认的测试用例的规则
1.模块名必须以test_开头或以_test结尾 (.py文件)
2.测试类必须以Test开头,并且不能有__init__方法(class 定义的类名)
3.测试方法必须以test开头 (def 定义的函数名)
4.默认从当前目录下收集测试用例,当配置testpath时,从配置的路径下手机测试用例
注:修改配置文件后,模块名、测试类、测试方法应该与配置文件一致
二、基本使用
2.1 创建测试用例
2.1.1简单的函数
def test_01():
    print('sede')
2.1.2 编写测试用例类
class TestHaha():
def test_01(self):
assert 1==1
def test_02(self):
assert 1==22.2 执行测试用例
pytest有多种方式来执行用例(unittest框架代码也可通过pytest运行)
2.2.1 通过pytest命令执行测试用例
1.进入要运行的目录下
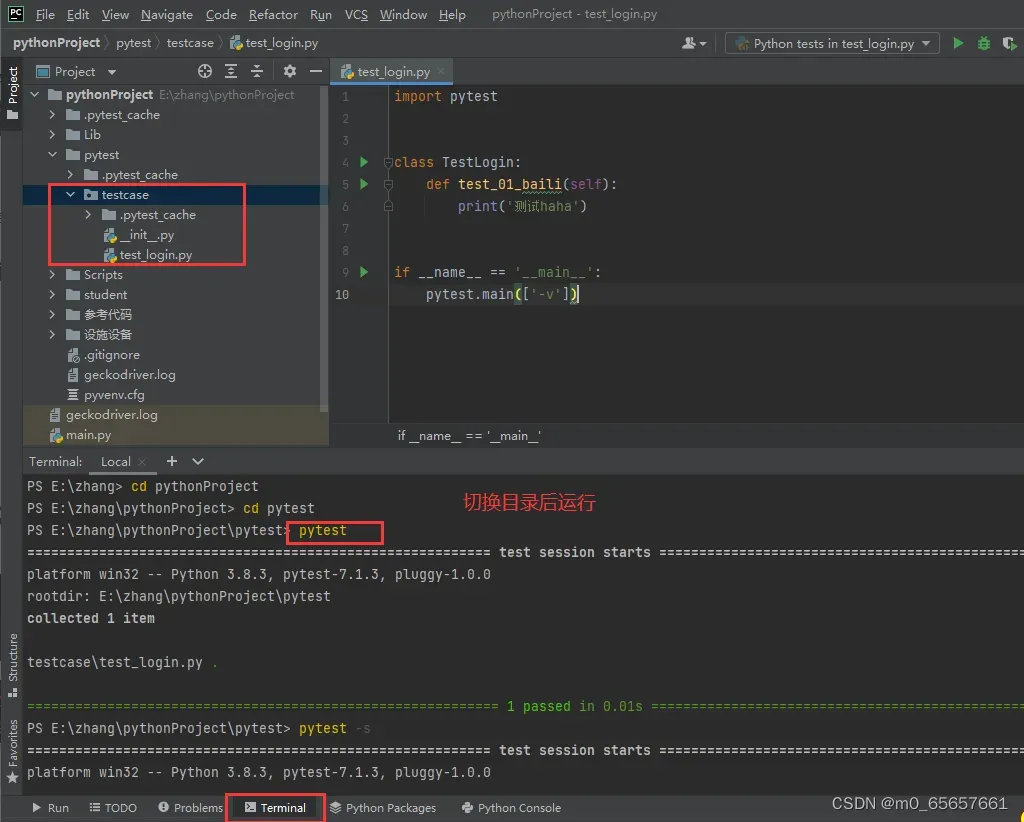
2.指定运行模块:pytest -vs test_login.py test_product.py #test_login.py和test_product.py为指定模块名
3.指定运行目录:pytest -vs interface #interface为指定目录
4.指定运行用例:pytest -vs interface/test_interface.py::test_04_func #interface为指定目录,test_interface.py为指定模块,test_04_func为指定方法
2.2.2 通过Python代码执行(主函数)
import pytest
if __name__ == '__main__':
    pytest.main(['-vs','test_login.py','test_product.py']) #test_login.py,test_product.py为指定运行模块名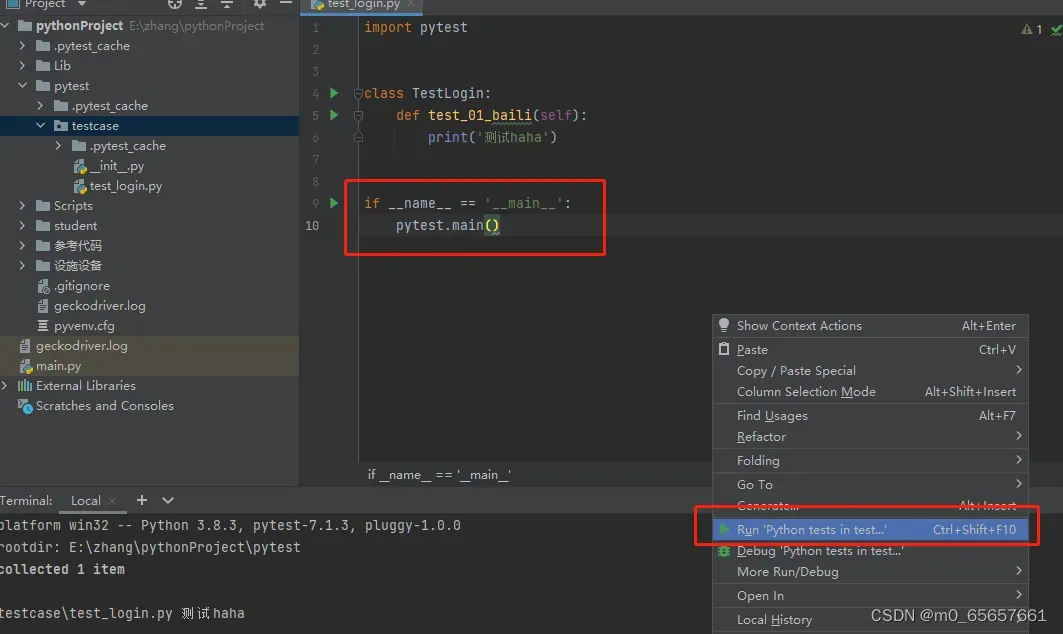
2.2.3 参数详解
-s:表示输出调试信息,包括print打印的信息
import pytest
if __name__ == '__main__':
pytest.main(['-s']) #主函数模式
pytest -s #命令行模式-v:显示更详细的信息
import pytest
if __name__ == '__main__':
pytest.main(['-v']) #主函数模式
pytest -v #命令行模式-vs:v和s两个参数一起用
import pytest
if __name__ == '__main__':
pytest.main(['-vs']) #主函数模式
pytest -vs #命令行模式-n:支持多线程或者分布式运行测试用例
import pytest
if __name__ == '__main__':
pytest.main(['-vs','-n=2']) #主函数模式
pytest -vs -n 2 #命令行模式–reruns NUM:失败用例重跑,NUM为重跑次数
import pytest
if __name__ == '__main__':
pytest.main(['-vs','--reruns=2']) #主函数模式
pytest --reruns 2 #命令行模式-x:表示只要有一个用例报错,那么测试停止
import pytest
if __name__ == '__main__':
pytest.main(['-vs','-x']) #主函数模式
pytest -x #命令行模式–mainfaill=2 :出现两个用例失败就停止
import pytest
if __name__ == '__main__':
pytest.main(['-vs','--maxfail=2'])#主函数模式
pytest --maxfail 2 #命令行模式-k:根据测试用例的部分字符串指定测试用例
import pytest
if __name__ == '__main__':
pytest.main(['-vs','-k=baili'])#主函数模式,若函数名包含baili则执行该用例
import pytest
if __name__ == '__main__':
pytest.main(['-vs','-k=not baili'])#主函数模式,若函数名包含baili则执行该用例
pytest -k 'baili'#命令行模式
pytest -k 'not baili'#命令行模式,不包含baili则执行–html ./report/report.html:生成html的测试报告
在项目根目录下新建一个report包用于存储报告
import pytest
if __name__ == '__main__':
pytest.main(['-vs','--html=./report/report.html']) #主函数模式
#命令行模式
pytest --html ./report/report.html更多具体参数信息参考官方文档:pytest:帮助你编写更好的程序 — pytest 文档
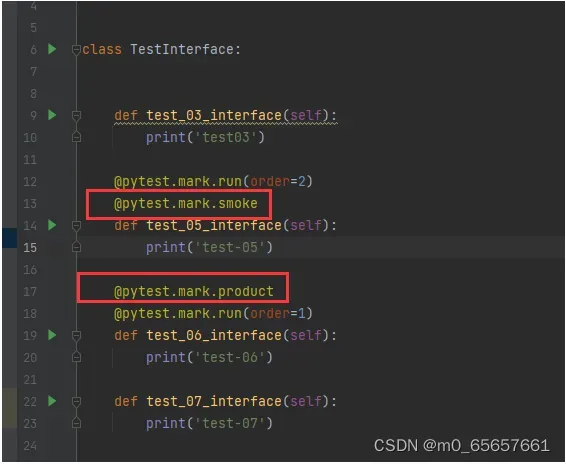
2.2.4 执行顺序
在模块级别采用模块名的ascii码顺序,在模块内部根据从上往下的定义顺序来执行。
可使用mark标记改变pytest默认的执行顺序
class TestInterface:
def test_03_interface(self):
print('test03')
@pytest.mark.run(order=2) #定义运行顺序
def test_05_interface(self):
print('test-05')
@pytest.mark.run(order=1) #定义运行顺序
def test_06_interface(self):
print('test-06')
def test_07_interface(self):
print('test-07')
#执行顺序为6-5-3-72.3 断言
在pytest中只需使用python语言标准的断言语句 assert 来断言。
2.4 前后置断言
2.4.1 经典的xunit风格
xunit是一种经典且流行的方式,该方式可以基于模块/类/函数实现固定装置(设置和拆卸测试状态)。
1.模块级别的setup_module和teardown_module:
在整个模块调用前后执行一次:
def setup_module():
'''
模块级前置条件
:return:
'''
print('我会在当前模块所有测试执行之前执行')
def teardown_module():
'''
模块级后置条件
:return:
'''
print('我会在当前模块所有测试执行之后执行')
def test_01():
print('sede')
class TestHaha():
def test_01(self):
print(234)
def test_02(self):
print(456)2.类级别setup_class和teardown_class
在整个类调用前后执行一次:
class TestHaha():
@classmethod
def setup_class(cls):
'''
类级前置条件
:return:
'''
print('我会在当前类所有测试执行之前执行')
@classmethod
def teardown_class(cls):
'''
类级后置条件
:return:
'''
print('我会在当前类所有测试执行之后执行')
def test_01(self):
print(234)
def test_02(self):
print(456)3.方法级别setup_method和teardown_method
在整个方法调用前后执行一次:
class TestHaha():
@classmethod
def setup_method(self):
'''
方法级前置条件
:return:
'''
print('我会在当前类里每个测试方法执行之前执行')
@classmethod
def teardown_method(self):
'''
方法级后置条件
:return:
'''
print('我会在当前类类每个测试方法执行之后执行')
def test_01(self):
print(234)
def test_02(self):
print(456)4.方法级别setup_function和teardown_function
在模块每个函数调用前后执行一次:
def setup_function():
'''
函数级别的前置
:return:
'''
print('我会在当前模块在每个测试函数执行之前执行')
def teardown_function():
'''
函数级别的后置
:return:
'''
print('我会在当前模块在每个测试函数执行之后执行')
def test_01():
print('sede')
def test_02():
print('sdjf')2.4.2 unittest风格
pytest支持unittest的夹具风格(可通过pytest的执行方式执行)
import unittest
class TestMay(unittest.TestCase):
@classmethod
def setUpClass(cls) -> None:
'''
类前置条件
:return:
'''
print('我会在当前类所有测试执行之前执行')
@classmethod
def tearDownClass(cls) -> None:
'''
类后置条件
:return:
'''
print('我会在当前类所有测试执行之后执行')
def setUp(self) -> None:
'''
方法前置条件
:return:
'''
print('会在当前类里所有方法测试执行之前执行')
def tearDown(self) -> None:
'''
方法后置条件
:return:
'''
print('会在当前类里所有方法测试执行之后执行')
def test_one(self):
print('test')
self.assertEqual(1,1)
def test_two(self):
print('cde')2.4.3 @pytest.fixture
pytest框架有一种通过装饰器实现的夹具机制
1.定义:
通过@pytest.fixture可以定义夹具
import pytest
@pytest.fixture
def fixture_func(): # 不能随便接受参数
print('pytest.fixture的一个前置条件')
yield '托尔斯泰' #yield所在行为返回值,yield上面的代码都是前置,后面的代码都是后置
print('pytest.fixture的一个后置条件')2.调用夹具:
1.通过装饰@pytest.mark.usefixtures(‘fixture_func’)
# 使用装饰器语法调用夹具
# 修饰函数
@pytest.mark.usefixtures('fixture_func')
def test_function():
print('我是一个测试函数')
# 修饰整个类
@pytest.mark.usefixtures('fixture_func')
class TestSome():
def test_one(self):
print('one')
def test_two(self):
print('two')2.通过在测试函数中定义与夹具函数名同名的参数
# 使用装饰器语法调用夹具
@pytest.mark.usefixtures('fixture_func')
def test_function():
    print('我是一个测试函数')
这种方式还可以接收夹具的返回值(夹具的返回值定义在yield所在行)
import pytest
@pytest.fixture
def fixture_func(): # 不能随便接受参数
print('pytest.fixture的一个前置条件')
yield 'test' #test为夹具的返回值
print('pytest.fixture的一个后置条件')
# 使用函数传参的方法来调用前置后置
def test_two(fixture_func):
print(fixture_func) #通过函数名调用夹具的返回值
print(12345)
# 在类中使用夹具返回值
class TestSome():
def test_one(self,fixture_func):
print('one')
def test_two(self):
print('two')@pytest.fixture
def db():
import pymysql
with pymysql.connnect() as conn:
yield conn #conn为yield返回值
@pytest.mark.usefixtures("fixture_func")
def testa(db):
cursor = db.cursor() #通过函数名调用夹具的返回值
cursor.execute('select * from student')
assert cursor.fetch_one()3.夹具的作用范围
通过@pytest.fixture装饰器的参数scope可以指定夹具的作用范围
function 默认范围,函数范围,在测试完成后结束
class 在类中最后一共测试完成后结束
module 在模块中最后一个测试完成后结束
package 在包中的最后一个测试完成后结束
session 在一次会话中的最后一共测试完成后结束
修饰类:
import pytest
@pytest.mark.usefixtures('class_fixture')
class TestSome():
def test_one(self):
print('one')
def test_two(self):
print('two')
# 如果使用scope='class'修饰类,在整个类执行前开始,在整个类所有测试执行完之后结束
@pytest.fixture(scope='class')
def class_fixture():
print('我是一个类级前置')
yield
print('我是一个类级后置')
# 其他scope参数值作用范围同理修饰模块:
# 模块级前后置,传入参数autouse=True运行时自动调用
@pytest.fixture(scope='module',autouse=True)
def moudle_fixture():
print('我是一个模块级前置')
yield
print('我是一个模块级后置')修饰包:
在测试用例包下新建conftest.py,内容如下:
import pytest
# 设置autouse=True,当pytest执行整个测试用例包内容时,自动执行
@pytest.fixture(scope='package',autouse=True)
def package_fixture():
print('我在整个包测试开始之前执行')
yield
print('我在整个包测试执行完成之后执行')修饰会话:
在测试用例包下新建conftest.py,内容如下:
import pytest
# 设置autouse=True,当pytest执行整个测试用例包内容时,自动执行
@pytest.fixture(scope='session',autouse=True)
def package_fixture():
print('我在整个测试执行前执行')
yield
print('我在整个测试执行后执行')4.共享夹具
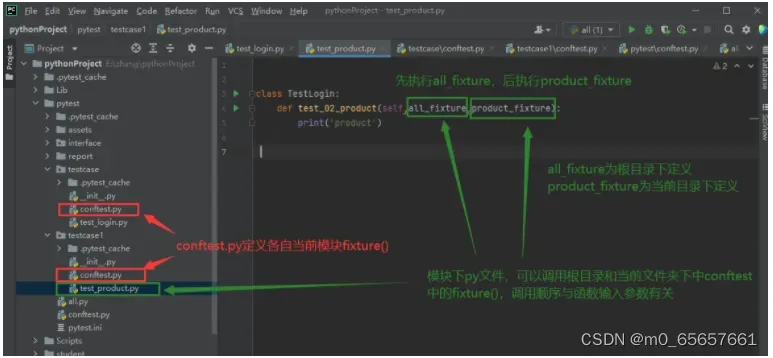
如果一个夹具需要被多个文件使用,则将其定义在conftest.py文件中,通过函数名调用,不需要在测试中倒入,pytest框架会自动发现并执行。
在同一目录下,新增conftest.py和test_01.py文件(在执行时先在当前目录下查找conftest.py中内容,若不存在则查找上层目录、上上层中conftest.py,若不存在,则报错)。
conftest.py文件内容如下:
import pytest
@pytest.fixture(scope='class')
def class_fixture():
print('我是一个类级前置')
yield
print('我是一个类级后置')test_01.py文件内容如下:
import pytest
@pytest.mark.usefixtures('class_fixture')
class TestSome():
def test_one(self):
print('one')
def test_two(self):
print('two')pytest运行test_01.py会自动运行执行引用的夹具
5.夹具的多层使用
import pytest
@pytest.fixture
def fixture1():
print('>1111111')
yield
print('1111111<')
@pytest.fixture
def fixture2():
print('>222222')
yield
print('222222<')
@pytest.fixture(scope='module')
def module_fixture():
print('模块前置')
yield
print('模块后置')
# 如果有多重夹具,先执行作用范围大的
# 当作用范围相同时,执行先修饰的(参数的传入顺序)
def test_func(fixture1,fixture2,module_fixture):
print('test_func')6.夹具的继承
除了可以在测试函数中使用夹具外,夹具功能还可以使用其他的夹具。这有助于夹具的模块化设计,并允许在许多项目中重复使用特定的夹具。
注意夹具的使用只能是使用范围更广的夹具,反过来不行。模块级别的夹具不能使用类级别的夹具。
import pytest
@pytest.fixture
def fixture1():
print('》11111')
yield 1
print('11111《')
# 夹具在继承的时候,被继承的夹具范围要大于等于继承夹具
@pytest.fixture
def fixture2(fixture1): # 需要fixture1的结果
fixture1 += 1
print('》22222')
yield fixture1
print('22222《')
def test_func(fixture2):
print(fixture2)
print('test_func')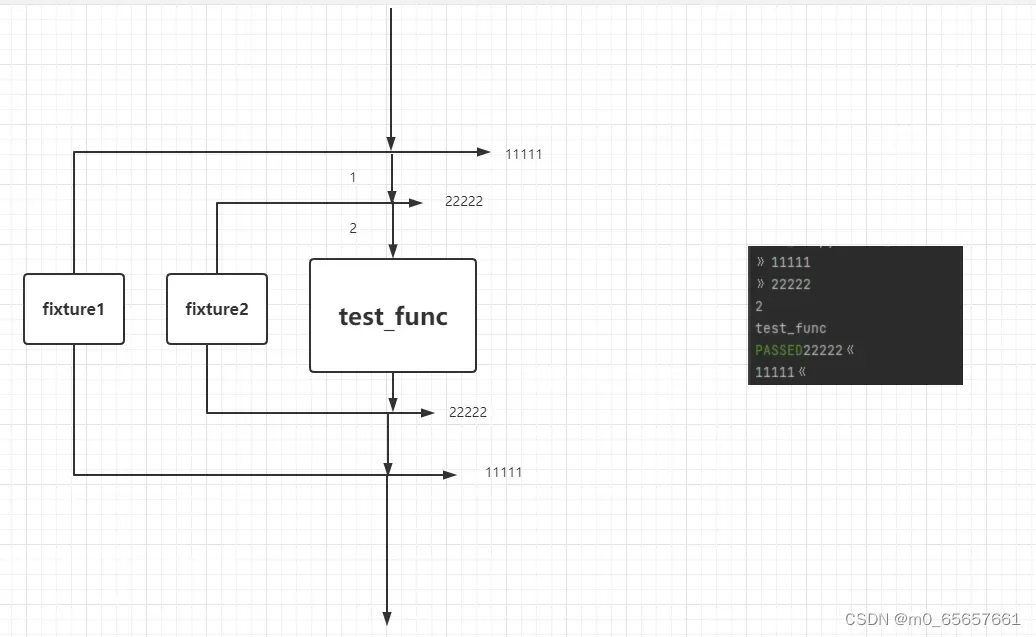
2.5 参数化
2.5.1 写法一
import pytest
@pytest.fixture(params=['avs','vsd','cd3'])
def haha(request):
print('这是前置的方法')
yield request.param #return和yield都表示返回的意思,但是return的后面不能有代码,yield返回后后面可以接代码
print('这是后置的方法')
class TestInterface:
def test_03_interface(self):
print('test03')
def test_05_interface(self,haha): #调用了haha方法,会将haha中传入的每个参数执行一次,一共执行三次
print('test-05')
print(str(haha))参数传递过程:在@pytest.fixture(params=[‘avs’,’vsd’,’cd3′])中进行定义,通过request传入haha,request.param获取单个参数值,参数值通过调用函数时haha传入,此时haha=单个函数值
params=[‘avs’,’vsd’,’cd3′]这里params是参数名,有s
request.param这里是属性名,是没有s的
注:return和yield都表示返回的意思,但是return的后面不能有代码,yield返回后后面可以接代码
2.5.2 写法二
import pytest
test_data=[
{
'num':1,
'expect_data':1
},
{
'num':-1,
'expect_data':1
},
{
'num':0,
'expect_data':0
}
]
# 将test_data解包为多个case
@pytest.mark.parametrize('case',test_data)
def test_abs(case):
assert abs(case['num'])==case['expect_data']import pytest
test_data2=[
[1,1],
[-1,1],
[0,0]
]
# 将test_data2解包为多个数据,然后再次解包并赋值
@pytest.mark.parametrize('num,expect',test_data2)
def test_abs2(num,expect):
assert abs(num)==expect2.6 夹具别名
name:给表示的是被@pytest.fixture标记的方法取一个别名
import pytest
@pytest.fixture(name='aaa')
def haha():
print('这是前置的方法')
yield
print('这是后置的方法')
class TestInterface:
def test_03_interface(self):
print('test03')
def test_05_interface(self,aaa): #通过别名调用
print('test-05') 取了别名之后,函数原本的名称不可用
三、生成报告
3.1 生成测试报告
pytest生成测试报告需要安装插件,请按插件说明来操作官方文档
3.2 生成allure报告
allure是一个专门生成测试报告的框架,支持多种语言和测试框架。官方文档
3.2.1 下载、解压、配置path路径
allure下载地址
解压后运行bin目录下allure.bat文件
配置path路径:【计算机–属性–高级系统设置–环境变量–系统变量–path–编辑】(E:\test ruanjian\allure-commandline-2.14.0\allure-2.14.0\bin)
验证:打开dos窗口,输入命令allure –version
问题:dos可以验证但是pycharm验证失败,则重启pycharm
3.2.2 加入命令生产json格式的临时报告
在pytest命令中带上参数 –alluredir ,指定报告生成的路径
–alluredir ./temp
import pytest
if __name__ == '__main__':
    pytest.main(['-vs','--alluredir=./temp/my_allure_results'])   #主函数模式

pytest --alluredir ./temp/my_allure_results   #命令行模式
#也可在配置文件中进行修改
3.2.3 生成allure报告
查看报告需要通过命令行启动allure服务
allure serve ./tmp/my_allure_results或
os.system('allure generate ./temp/my_allure_results -o ./report --clean')allure generate #命令,固定的
./temp #临时的json格式报告的路径
-o #输出output
./report #生成的allure报告的路径
–clean #清空./report路径原来的报告
四、pytest.ini配置文件
pytest.ini这个文件是pytest单元测试框架的核心配置文件(配置文件中,因编码格式问题,需删除注释)
4.1存放位置
一般放在项目的根目录
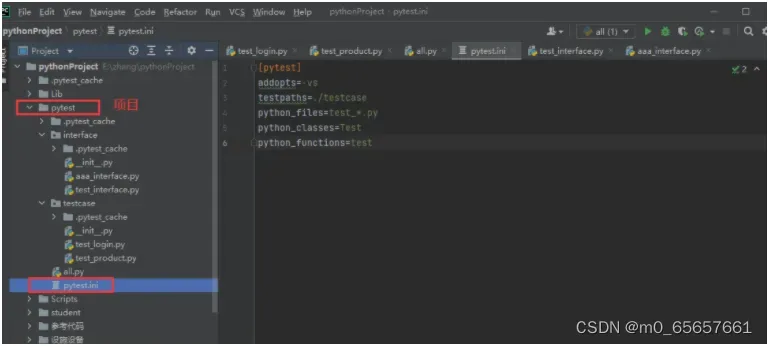
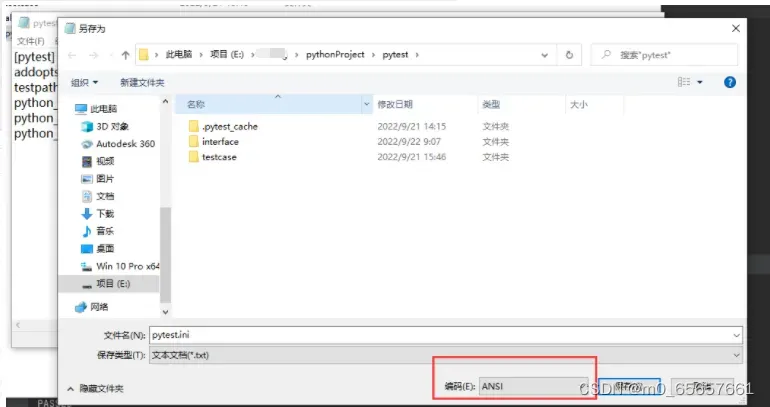
4.2 编码格式
必须是ANSI,可以使用notpad++修改编码格式,或者新建txt文本,后另存文件为ANSI编码,修改文件名称
4.3 作用
改变pytest默认的行为/规则
4.4 规则明细
不管是主函数的模式运行,命令行模式运行,都会去读取这个文件
[pytest]
addopts=-vs                 #命令行的参数,可以输入多个,用空格分隔,主函数和命令行模式处直接执行
testpaths=./testcase        #测试用例的路径
python_files=test_*.py      #配置测试搜索模块名的规则
python_classes=Test         #配置测试搜索类名的规则
python_functions=test       #配置测试搜索方法名的规则(函数)
markers=                    #标记的模块
    smoke:冒烟用例
    uermanage:用户管理模块
    productmanage:商品管理模块
五、分组执行(冒烟、分模块执行,分接口和web执行)
1.在pytest.ini文件中配置标记的模块
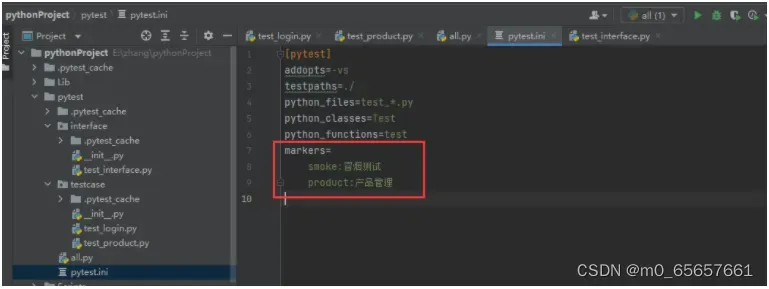
2.在用例处插入标记
3.通过主函数模式或命令行模式调用mark实现分组执行
#主函数模式
import pytest
if __name__ == '__main__':
    pytest.main(['-vs','-m=smoke'])

import pytest
if __name__ == '__main__':
    pytest.main(['-vs','-m=smoke or product'])

#命令行模式
pytest -m 'smoke'
pytest -m 'smoke or product'
六、pytets跳过用例
6.1 无条件跳过
无条件跳过,定义用例
@pytest.mark.skip(reason='跳过原因,可不输入')6.2 规定条件跳过
有条件跳过,定义用例
@pytest.mark.skipif(age>18,reason='跳过原因') #age>18为筛选条件,满足则跳过6.3 运行
运行:
import pytest
if __name__ == '__main__':
pytest.main() #主函数
pytest #命令行文章出处登录后可见!